Death To Spotify
A Journey in Turning My Apartment Into a Music Cloud.
The Final Straw
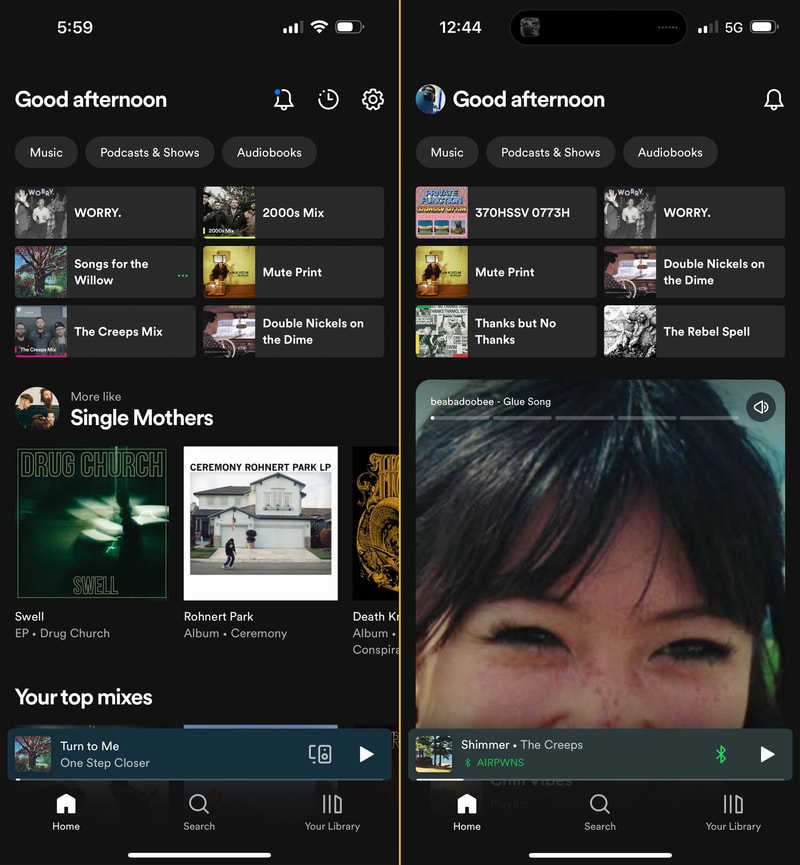
The final straw was fucking up my home page. I could tolerate all of Spotify’s many annoyances, so long as starting playback of something I reasonably wanted to listen to remained a quick and painless experience. Back in early March 2023 Spotify announced they were jumping on the bandwagon and turning their app into a TikTok feed of algorithmic suggestions. By March 23rd I had the new UI feature flag flipped on my account, and this is what my home page looked like:
Here’s an example of what Spotify thought I would enjoy:
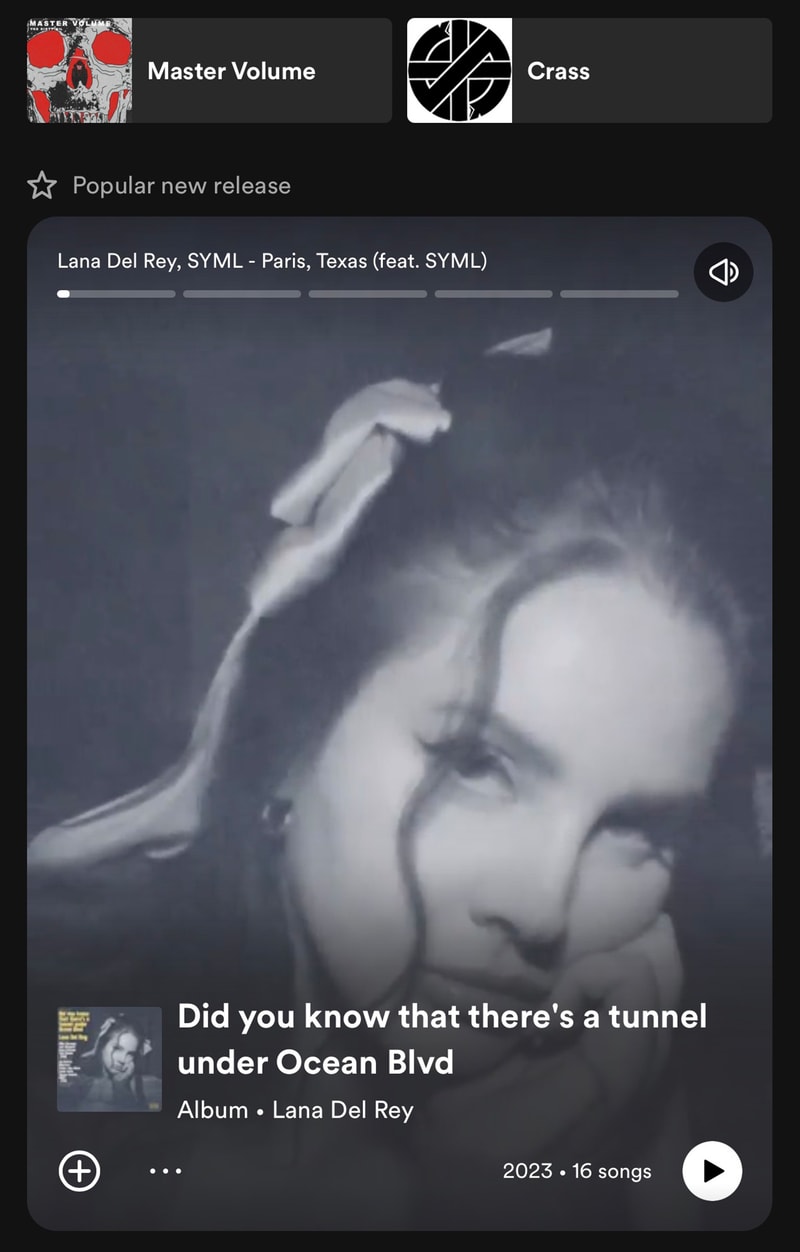
Look, I am sure that Lana Del Rey is a truly lovely woman, but I can promise you that I never have and never will be interested in intentionally listening to a Lana Del Rey song. It was clear this was a way for Spotify to push the crap that they are incentivized to sell - right in your face.
My music is sacred. The commodification of all my online social interactions to sell ads is one thing, but don’t touch my music! This update made figuring out what you wanted to listen to from your library impossibly tedious. Gone was the easy access to recent albums and artists you were enjoying, quick links to all of your playlists and daily mixes. Now here was something that would hijack your speakers to auto-play Joe Rogan podcast clips. It was truly a horrible user experience and I was not alone in my dissatisfaction.
Oh and just to be clear I don’t claim to enjoy Crass’ music either, but in context it’s a pretty funny screenshot.
Grievances
I won’t go into detail about all of my grievances with Spotify but to list a few from over the years:
- Piss poor revenue for small artists
- Albums and songs disappearing from the catalog
- Implementing shuffle as ‘randomization’ (leading to frequent song repeats)
- Auto-play not able to be disabled on Spotify Connect devices
- Replacing the ‘heart’ feature
- Inclusion and pushing of podcasts
- Stale and poorly recommended Daily Mixes
- Poor/no support for multiple releases of the same record (remixes, remasters, reissues, etc)
- AI “music”
- Just generally being pure evil, and completely antithetical to independent art
Disappearing Music
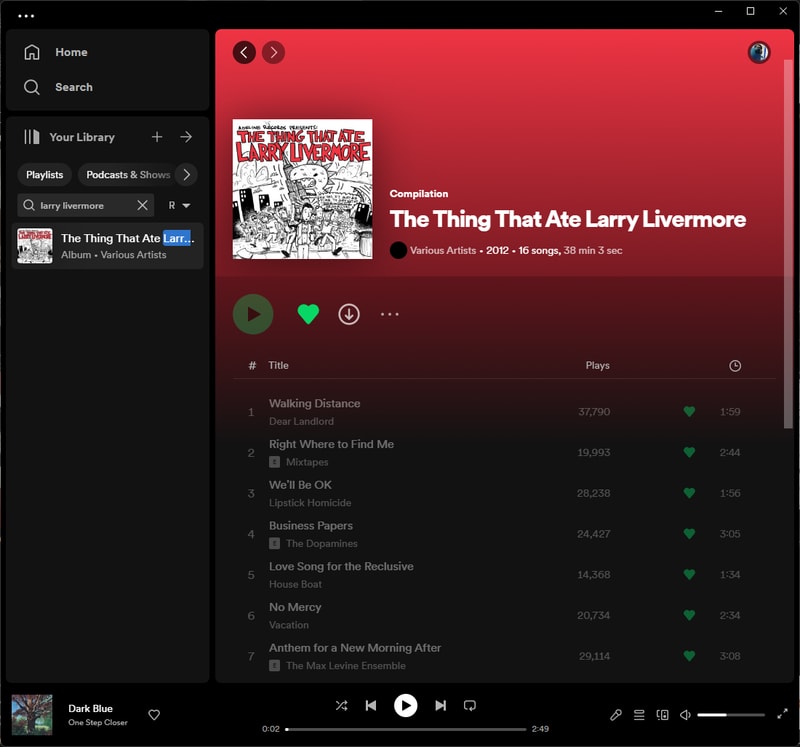
Here is one of my favorite compilation records: The Thing That Ate Larry Livermore. As you can see it exists in my library but none of the songs are playable. When a label stops paying to publish their catalog on the platform, Spotify will stop hosting it. Far too many of my favorite releases and records either never existed on the platform or have disappeared over time. In this case I own both a physical and digital copy of the album so it wasn’t lost to me but once again here was another obstacle in the way of enjoying the music that I want to listen to.
Stale Daily Mixes
As someone who used to listen to a lot of Spotify’s auto-generated playlists (Daily Mixes), music can start to feel a little malaise if you let Spotify make all the decisions for you. Maybe it’s the artists I tend to listen to or the way that I obsessively consume individual albums for long periods of time, but I found that if you don’t take an active role in music discovery, Spotify will not benevolently deliver the goods. Your playlists and radio stations tend to fill with the same select artists and songs you have heard 10 million times. To the point where I have had to ban certain artists (whom I previously enjoyed) from appearing in Spotify Radio. Latterman is great, but I swear if I hear Fear and Loathing on Long Island one more time I will spatter my brains on the walls of a random Denny’s bathroom.
Poor Royalties for Artists
I won’t try and break down all of the financials for independent artists in the modern age, but they aren’t great. Spotify pays something like $.004 per stream. Not the lowest of the streaming services but pretty low on the list. I hate the prospects of streaming revenue for artists in general. Spotify gets a lot of heat as it’s the largest service out there, but all of these Music Streaming Platform as a Service companies are guilty.
For everyone but the top major label earners, being a musician in a band is one of the worst ways to guarantee your financial future. I like to patronize and support the artists I love as much as I can. For the most part buying merch, going to shows, buying their music physically (CDs, Vinyl, Downloads), and even just sharing the band with your friends will put significantly more money in bands’ pockets than streaming ever will.
A few years ago a record shop and label in the UK: Specialist Subject Records put out a small zine entitled A Guide to Supporting Bands in the Streaming Age. I’ll have to see if I can find the PDF somewhere, but here it is in blog format. It does a good job of explaining the best ways you as a music fan can support artists nowadays.
To run through a little example:
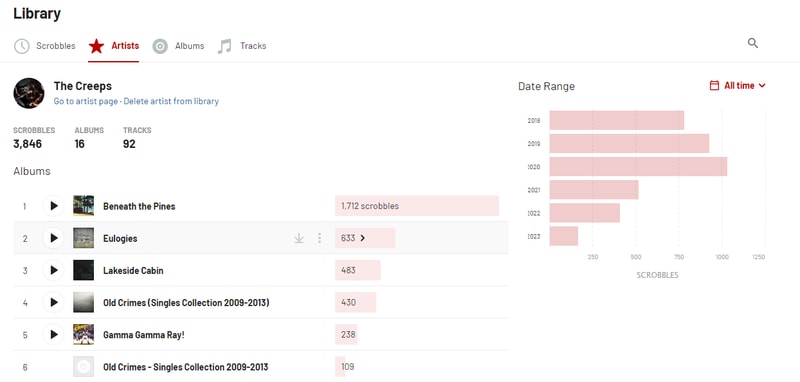
Here are my Last.fm stats for The Creeps from Ottawa, Ontario Canada. As you can see, I was a bit obsessed with Beneath The Pines for a couple of years there. Putting that in perspective my near constant streaming should equate to a pretty significant chunk of revenue right? Well at ~$.004 earned per stream x 3846 scrobbles = a whopping $15.38. That’s the whole share. Labels, distribution, managers, etc. all have to be paid first mind you.
Let’s contrast that with how much I spent on physical media from the band in the same time frame:

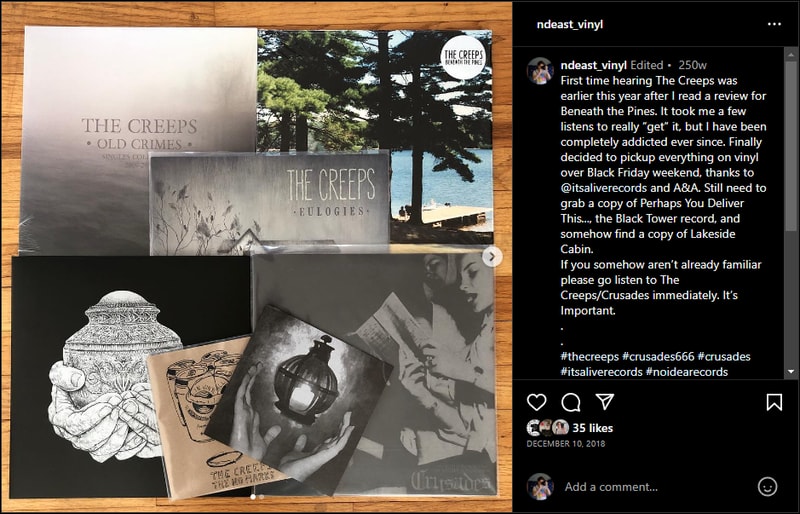
Not to brag but I have a complete (minus test pressings) Creeps collection on vinyl. That’s (10) 12“s and (6) 7”s. If we limit to exclusively the records I purchased directly from the band/label lets call it 6 LPs or $150 spent at $25 a record. Records cost roughly $7 to manufacture, that’s about $108 for The Creeps to split amongst themselves and their label. $108 seems like a bargain for the amount of enjoyment I get out of their music, but makes the 6.5x lower Spotify share seem absurd.
The intricacies of streaming payouts is intentionally complex, so reducing the math this far down probably isn’t incredibly accurate. The long and short of it is that once again independent artists are entirely shafted by the machine. Spotify grows to umpteen billion dollar valuations, major labels defer and negotiate lower streaming payouts in exchange for exposure and market share for their biggest artists. Not to mention their investments in all of these streaming platforms. This is nothing new, the music industry always comes out on top, and I guess this just leads to a greater ethical discussion of how much you want to participate in the scheme.
To be clear - I am not saying you need to go out and buy a complete vinyl collection for every band you listen to, nor should you feel guilty about using Spotify. If supporting independent artists is important to you however, just know that being a part of your local scene, seeing shows, and buying the records will be infinitely more impactful than the pittance that stream shares pay out.
I don’t expect to find a personal solution that rights the wrongs of the music industry here, but I would much rather spend my monthly $11.99 on Bandcamp Friday than contribute towards the coffers of Daniel Ek.
The Positives of Spotify
I had tried many times in the past to divorce myself from the convenience of Spotify’s grasp but I was never able to find a competitor that rivaled Spotify’s tech. As much as their app pissed me off, and their developments never-endingly-user-hostile, the one thing it did better than anyone else was play and stream unlimited music. A music streaming apps most important feature.
Spotify Connect is just brilliant. Spotify Connect is a feature that allows you to use any of your devices as an endpoint or a remote control for a different endpoint. I could be at the gym listening to music on my phone through my AirPods, come home, and in 2 button taps switch my playback destination to my Sonos Amp to start playing on my living room speakers. Then as soon as I sit down at my desk I can seamlessly control playback on my PC. Aside from some minor glitches here or there, or all those times I would accidentally swipe the volume on my apple watch and send my subwoofer into earthquake mode - music playback was bulletproof.
None of the other streaming services seem to have this figured out.
Apple Music is fine but requires Apple devices (for a first party experience), and forces you into using AirPlay for casting.
Tidal got close when they rolled out their own Connect feature a few years ago, but of course, Tidal Connect only works on mobile! Without desktop or web app support, it severely limits its functionality. Tidal feels so cumbersome to search and browse, I never enjoy using it. I want to love Tidal so bad, as they are one of the only platforms that seem to take artist payment seriously. The app just doesn’t cut it.
Don’t even get me started on Deezer.
As big and daunting of a task I knew it would be, I had no choice left but to figure out how to wrangle my digital music library, and find a way to enjoy my own files in the modern streaming age.
My Current Setup
Here is what I am starting with.
Music Library
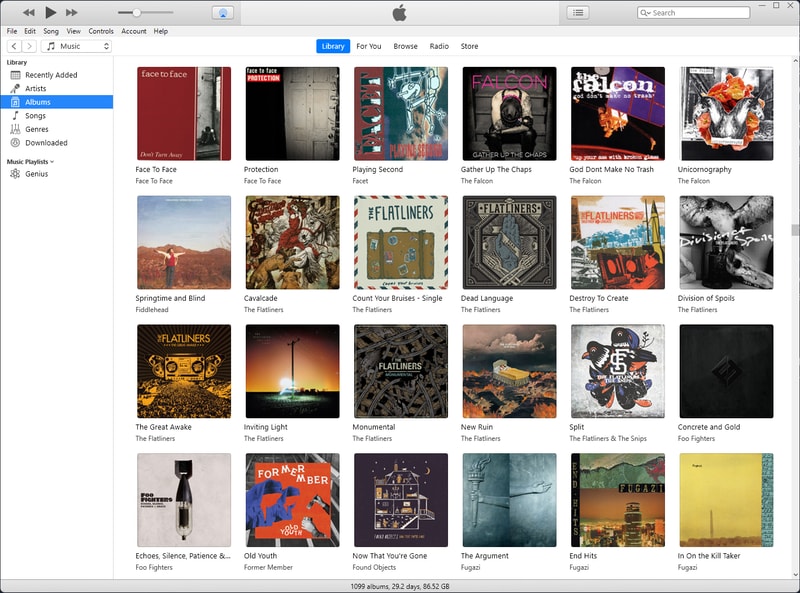
The digital music library I have been curating for almost 20 years now has been housed in an iTunes library for almost that entire time. I remember switching from winamp to iTunes around the time I got my first generation iPod Nano, so ~2005 I guess. My library has gone through many iterations of content and quality, as both my taste in music evolved throughout my early to mid teens (and beyond), and audio compression got better and more ubiquitous.
As of today my iTunes library is what I sync locally to my iPhone and all the music is either ripped, or downloaded to MP3 v0/320kbps.
In addition to my iTunes library I have a significant amount of albums in lossless FLAC. When I download a FLAC release I then transcode it into MP3 for my iTunes library so technically a lot of these are duplicates.
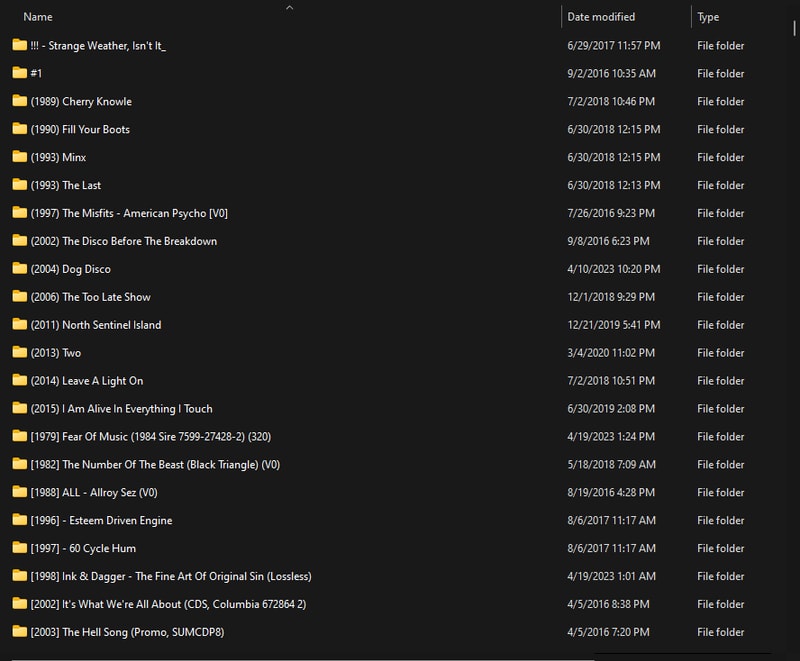
A large part of my collection is ripped from my personal CD collection. Bandcamp purchases, and download codes included with vinyl records have become my primary source for new digital music.
In total my music library (lossy iTunes + FLAC collection with duplicates) is about 380GBs.
Hardware
My data is currently stored on my main desktop PC on a pair of mirrored 4TB drives. My PC is backed up to Backblaze for cloud storage, and I also semi-frequently (read: not frequently enough) backup my library and other important documents to a couple external drives.
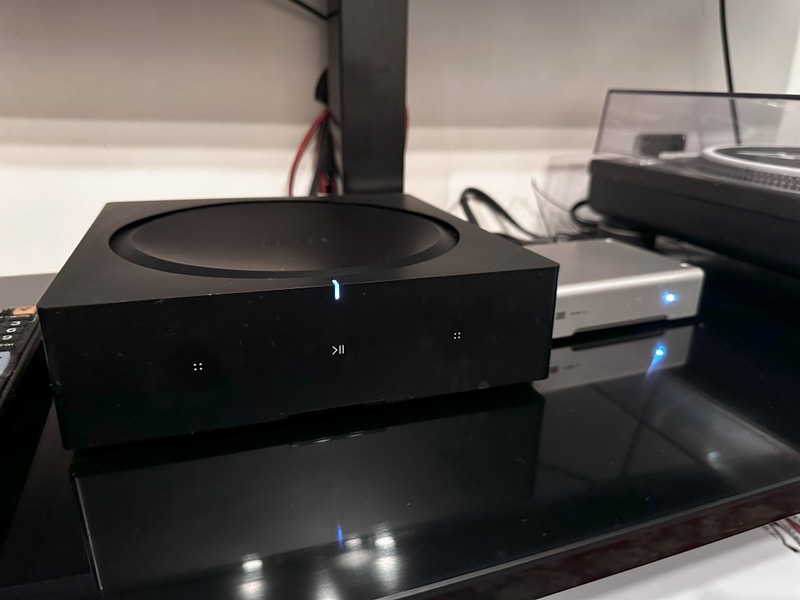
I primarily listen to music through a pair of Polk bookshelf speakers connected to a Sonos Amp:
At my desk I listen to a pair of Sennheiser HD600s connected simply to the onboard soundcard of my Windows PC.
Finally, when on the go I am streaming from my iPhone either to a pair of AirPod Pro 2’s, or through CarPlay.
As it stands, I am incredibly comfortable with the listening devices in my setup, I’ll be okay with hardware additions, but I’d love to keep these things the same.
My Requirements
What do I need to be suitably happy to never open the Spotify app again?
-
Self-hosted. Ability to stream my library at home locally and away from home over the internet
-
Support large and expanding music libraries with metadata
-
Ability to cast music to my Sonos Amp.
- Although a feature as seamless as Spotify connect would be preferred, I am willing to make concessions if I have to - but playback on my speakers is mandatory
-
Open Source and roll your own as much as possible
That shouldn’t be too hard to figure out right?
Self Hosted Streaming Frontends
After quite a bit of research I came to find three candidates in the self-hosted music streaming space. Plex (with Plexamp), Roon, and Navidrome. Roon and Plex are both closed source and subscription based applications, whereas Navidrome is currently the most actively developed free and open source application.
My first step is evaluating each of these three options on their own to see if self-hosting a media library is a feasible path for me to go down. They are all easy to install side by side on my desktop and I’ve spent about a week using them day to day. Here is the breakdown.
Roon
Roon is the audiophile’s wet dream. It is packed to the gills with all sorts of metadata, and extra information about genres, artists and labels.
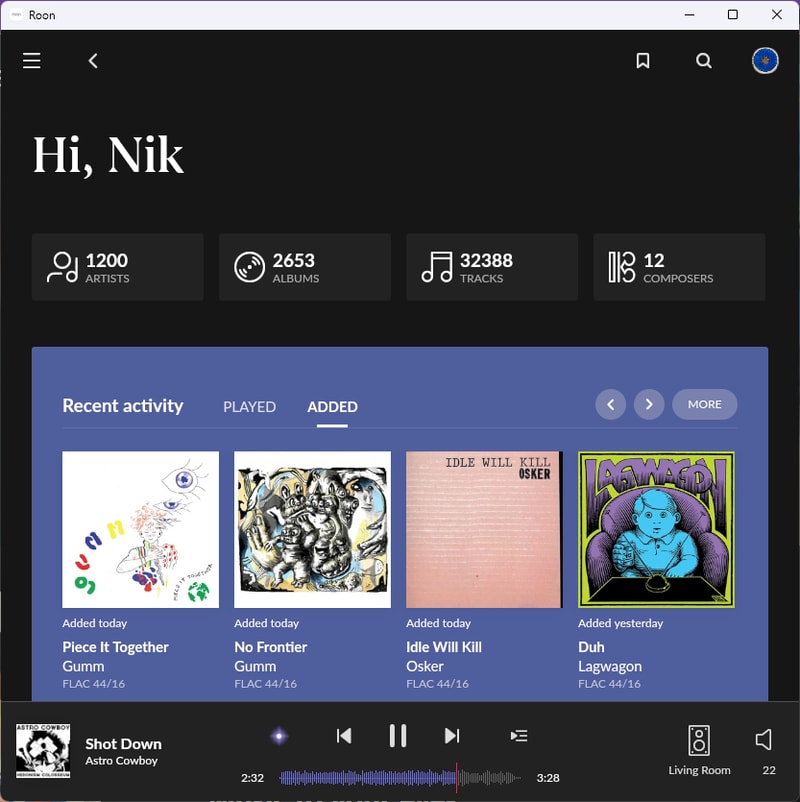
Roon does its best to simulate the experience of having physical liner notes in your hand as you browse through your collection. Being able to dig down into the rabbit hole of my library, and discover that J Mascis did in fact rip a couple guitar solos on one of my favorite Lemonheads records - is pretty cool.
Casting
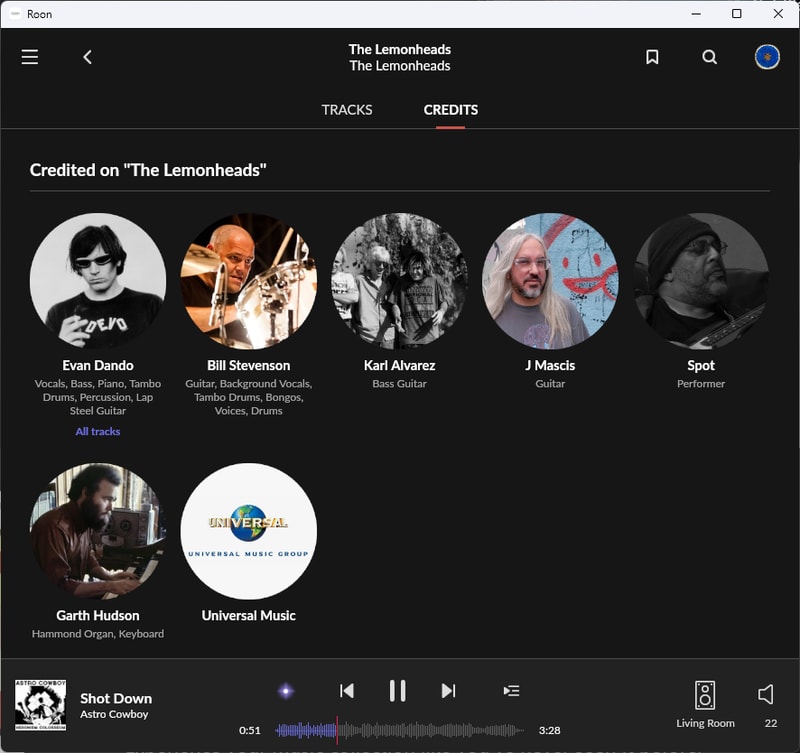
Roon has a very mature Connect feature. It was primarily developed for local playback of very diverse and high quality audio formats so the ability to playback on different devices is expansive. Sonos is supported natively or via AirPlay, and through the Roon mobile or desktop app I can control my music stream. It also has a very fancy DSP (Digital Signal Processor) which I have yet to really dive into, but is a very good value add. This is exactly the type of feature I am looking for.
Album Versions and Duplicates
Roon handles duplicates exactly how you would hope. The album is listed once with different variations (file type, sound quality, remaster, remix, etc.) and Roon lets you select the Primary Version to play when you search for that album.
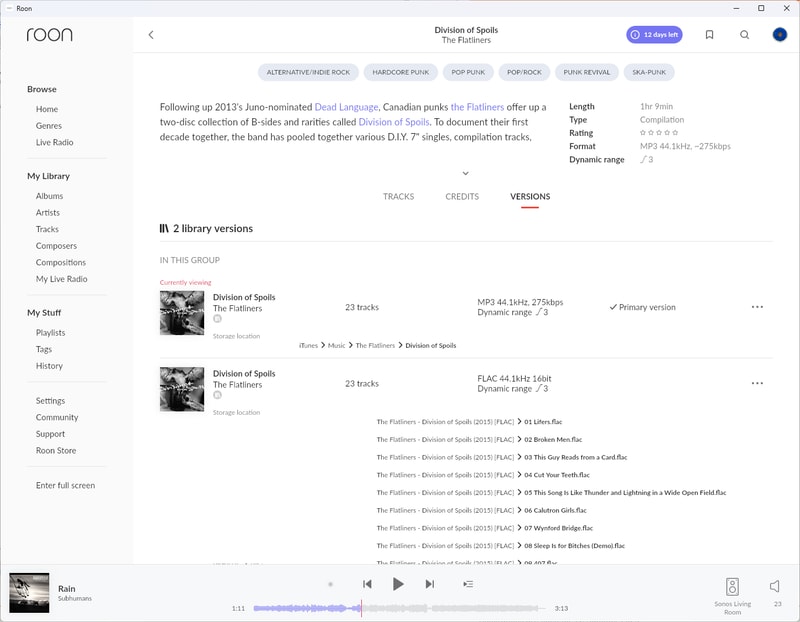
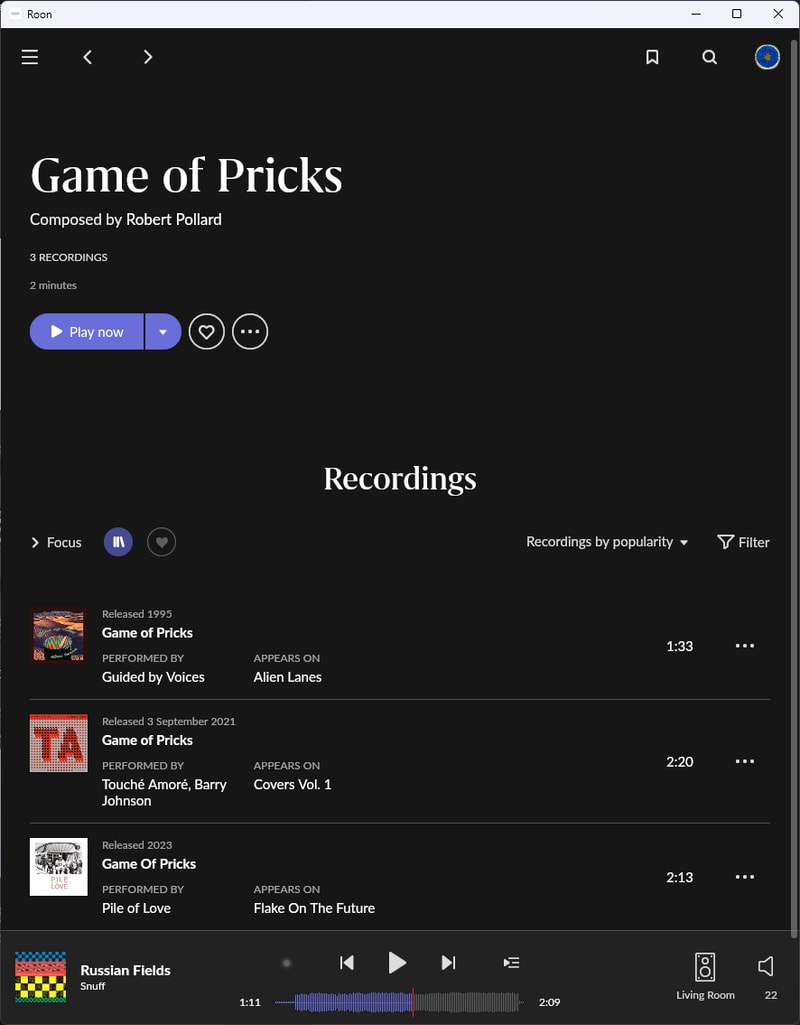
This extends to individual tracks and cover songs too:
Roon ARC
The real killer feature of Roon is the newly introduced Roon ARC which introduces streaming your local library over the internet, through a new mobile application. It brings most of the awesome metadata and library features over and playback is pretty seamless.
One frustration I found is that the Roon app for local playback and the Roon ARC app for internet playback are separate entities. Due to a different networking stack they were built to sit side by side instead of subsisting as one. The only way I really feel this (besides having to exit and open a different app) is that whatever I am actively listening to on my phone is not picked up on my local queue. It does sync “recently played” however and that has been decent enough for me to pick up where I left off when I get home.
Reliability
As far as reliability goes, I have definitely faced some bugs. One particularly frustrating Roon ARC bug I kept running into at the gym was a full server crash when my phone switched networks. My gym is technically on the basement floor, so past the free weights and into the cardio room my phone would switch from a poor wifi connection to an even poorer LTE signal. This severely confused Roon, and 7/10 times required a full server reboot. Exceptionally frustrating.
I am sure these bugs will continue to be ironed out as the software matures, but for the price they charge, game breaking bugs like these aren’t really acceptable.
Price
Roon has a major drawback and that is its price. The Roon target market is audiophiles. Depending on your degree of -phile - your personality will often range from mildly repulsive to downright insufferable. This can be measured scientifically based on the number of $10,000 pure silver AudioQuest Ethernet Cables one owns.
Look, I am biased. I have a disdain for purely consumerism based ‘hobbies’ in which the goal is to purchase ever increasingly expensive products to brag about on Reddit as you try to fill the void in your empty heart. Since this market exists however, Roon is capable of selling absurdly expensive mini PCs and charging $15/mo or a whopping $829.99 for a “lifetime subscription” to their software.
Music is my life (that’s called a cliché folks!) and I love having a modest home audio setup, but I am not an audiophile. Once I have a configuration that works I don’t continuously upgrade it for nominal imperceptible benefit. I don’t have a reputation to uphold on head-fi and I am not yet swimming in diamond-studded swimming pools. $15/mo is a hard pill to swallow for what is essentially streaming my own files, via my own network. The increase to $829 for a lifetime license just seems astronomically predatory.
Maybe if the next couple of alternatives weren’t so equally incredible and affordable (or free!!) I would understand, but as it stands Roon is getting uninstalled.
Navidrome
Next up is Navidrome. Music playback on the webpage is great and just what you would expect. It supported my entire library, loaded super fast, and looks quite pleasant. There were no options for casting built in.
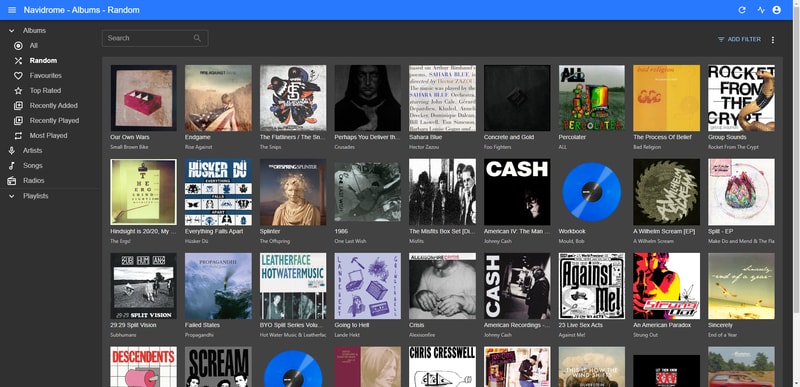
If I am going to be self-hosting this service it only seemed right to try something open source, and potentially hackable.
On that front Navidrome is great. It is built in Go and interfaces with the Subsonic API. The documentation is thorough and the community is quite active.
For those unfamiliar, Subsonic was another music server project that is no longer being maintained, but it lives on as the core of a whole bunch of different forks. You can read more on its history, but the short of it is that by implementing the Subsonic API on the backend, Navidrome is able to use large swaths of Subsonic compatible players as front ends.
Subsonic iOS Clients
I wanted to test some mobile (iOS) clients, and found some good recommendations on the Navidrome Subreddit.
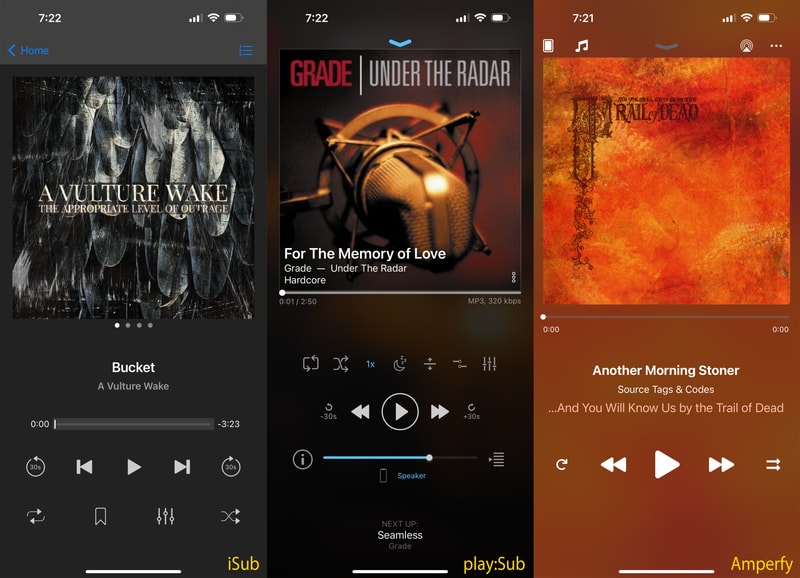
I enjoyed using all three of these apps, but they all had some jank. I think that is to be expected, although the clients available for Android seem to be significantly more fleshed out. I guess app developers know their target market?
Now what is missing from all of these apps? Well, there really isn’t any solid support for casting to other devices. All of the apps can play music to my Sonos system via AirPlay, but I dislike having my phone audio paired to my speakers and of course its not able to be remote controlled from another source.
Jukebox Mode
Navidrome recently implemented Jukebox mode: a subsonic feature that allows for the audio server to serve as the output device, with other clients able to change the queue. Pretty close, but not exactly the feature that I am looking for, maybe I could make it work?
Lets say I dump my Sonos Amp for a dumb amplifier with an extra input, build my own Raspberry Pi music streamer, and run a subsonic server on it. I could effectively do what I was looking for, but man, that’s a demotivating amount of scope creep.
Many people do want to get Chromecast, Airplay or some other casting framework built into Navidrome. And there has been some hacky solutions as tracked in this issue, but even as of 2025, nothing concrete is available.
sigh
I think this project is fantastic, and I am willing to acquiesce a lot of things to stick with open source software, but for the moment it isn’t the plug and play solution I am looking for. I will hold out hope for my last option.
Plex
Plex is probably the biggest name in the self-hosted media sphere. Originally developed with TV and Movie streaming in mind, they have since released a dedicated music streaming client called Plexamp. Available for no extra cost to Plex Pass subscribers ($5/mo. or a $120 lifetime subscription) it’s far more affordable and less slime ball than Roon.
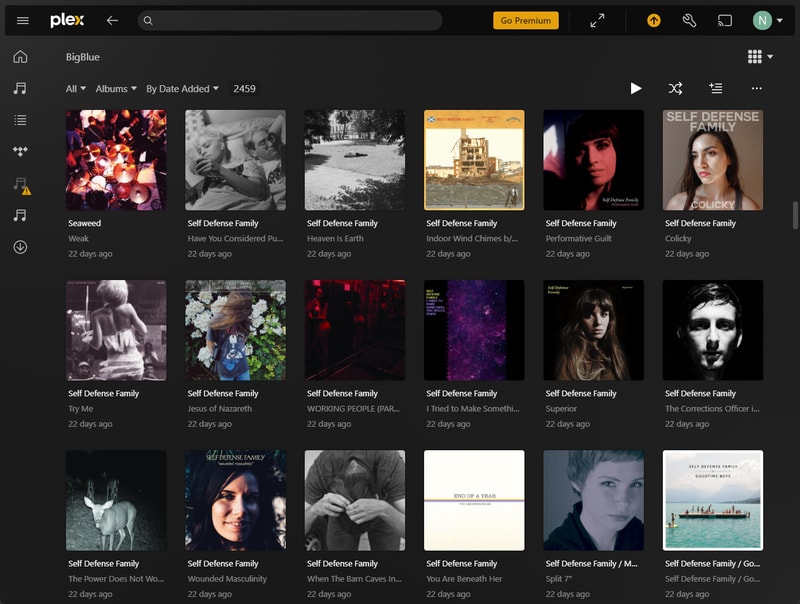
Plex was super easy to setup and have scan my library. Search and organization is fast and fluid, tons of customization. This really felt like feature-complete software.
Casting
Casting worked absolutely perfectly out of the box. It integrates directly with my Sonos Amp, and playback streams can be controlled from different devices. This is exactly what I was looking for. It operates just as seamlessly as the Spotify client, this was promising.
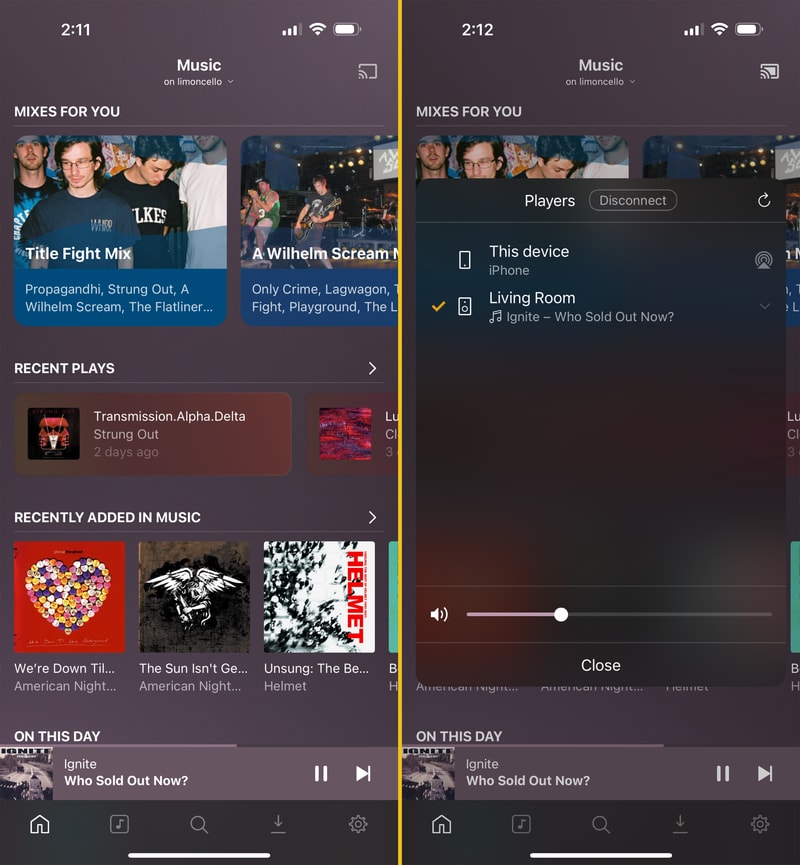
Metadata and Algorithms
Metadata is limited in comparison to Roon, that’s for sure. Most of the data was pulled directly from the track files themselves, or supplemented with Last.fm and MusicBrainz data. I don’t see granular details about individual producers on specific tracks, but at least all of the important pieces are there. Related artists, albums, songs, top tracks, and occasionally funny album reviews from early 2000’s Last.FM users.
While one of my goals was to reduce algorithmic influence on my listening habits, I have found Plex’s sonic analysis features quite good. It can suggest sonically similar music in radio stations and mixes, and playlist recommendations are pretty solid. As Plex doesn’t have an incentive to sell you the hottest new industry plant, I find it’s ability to pull deep cuts from my library a lot more consistent.
If algorithms are entirely not your thing, you can just disable them! Just rearrange your home screen if things become overbearing. A breath of fresh air.
Gripes
One gripe though is the very lovely Plexamp is only designed as a mobile app. There is a desktop version, but it’s really just a wrapper over the mobile app. It is far from pleasant to use with a mouse. This isn’t a deal breaker as the traditional Plex desktop application works just fine, it’s just a little more bloated than my use case, and you miss out on the Plexamp specific features.
High Hopes
I can’t believe I tried this one last, as it’s almost perfect. Out of my 4 criteria, it easily meets the first three. Plex is not open source, but from what I have observed, development is very active, ample user support forums, and the price seems incredibly fair. I tried out the $5/mo Plex Pass, and upgraded to a lifetime license, when they put it on sale last summer.
The Library Management Problem
With the frontend question out of the way, now I needed to figure out a more robust and automated means of managing my music library. Nothing was organized, I have swaths of duplicates, my process of importing new music involved manual transcoding, and a bunch of copy and pasting. There had to be a better way.
When I decide to tackle a project I try very hard to do things the right way. I want to learn quality skills and information along the way. If I take shortcuts I am at best not getting the full experience, and at worst, teaching myself the improper way of doing things. Junk knowledge. On top of that, this is going to be a system that I have to maintain. I want to be kind to future me and do him as many favors as possible.
This means I have no choice. I am gonna have to build a NAS, I am gonna have to buy a server computer, learn virtualization, and do a lot of research. Sounds like fun.
Building a NAS
Choosing Software
The first step was to find a place to store all of my music files. Keeping all of my data on my desktop wasn’t going to be tenable if I wanted this server to run 24/7, and I figured this would be a perfect use case to build some network attached storage. Something I had been meaning to do for a while anyway.
The question of software is tricky. There are a few choices to make:
- Virtualized or bare metal
- Filesystem
- NAS Operating System
By narrowing down the first two choices the third seemed a lot less daunting.
The primary reason to virtualize your home NAS is if you wanted to run the rest of your services from the same physical box. While this is certainly attractive from a (physical) space perspective, it just feels more fragile. I want something robust, dedicated, and simple to maintain.
The filesystem question seems easy. ZFS provides many features that improve data performance, help prevent and repair data corruption, and allows for snapshots. It seems like the best tool in the shed when it comes to a home NAS filesystem.
With these two questions locked down, picking an OS made a lot more sense.
There are a bunch of different NAS operating systems out there to consider but the main ones on my radar are:
UnRaid seems to primarily be designed with a “one box” server in mind. UnRaid is closed source which is unappealing in its own right, although it seems a lot more user friendly and less technically daunting.
TrueNAS Scale is iXSystems’ newer, “one box” server offering, while TrueNAS Core is their rock solid bread and butter.
While OpenMediaVault does look promising, TrueNAS has been around the longest, has the most ubiquitous forums and blog posts, I figure I should stick with tried and true. So TrueNAS Core it is.
Hardware Selection
With software determined, it’s time to figure out what hunk of metal I can run this on.
Closet Computer
Instead of buying a prebuilt system which gets exorbitantly expensive, and comes with a lot of overhead that I don’t think I need, I wanted to find a more eco(nomically/logically) friendly solution.
After running a dumb overclock for too many years on my second-to-last PC, I ended up frying either the CPU or motherboard. I had nothing salvageable in my closet except for the case. Thankfully I know my best friend Steve has a very well un-maintained “junk room” and likely still had the old PC I built for him 8 or 9 years ago. This was way back when we were merely fair-weather friends of friends. Sure enough, $100 and a Dominos pizza later, check out what I got:
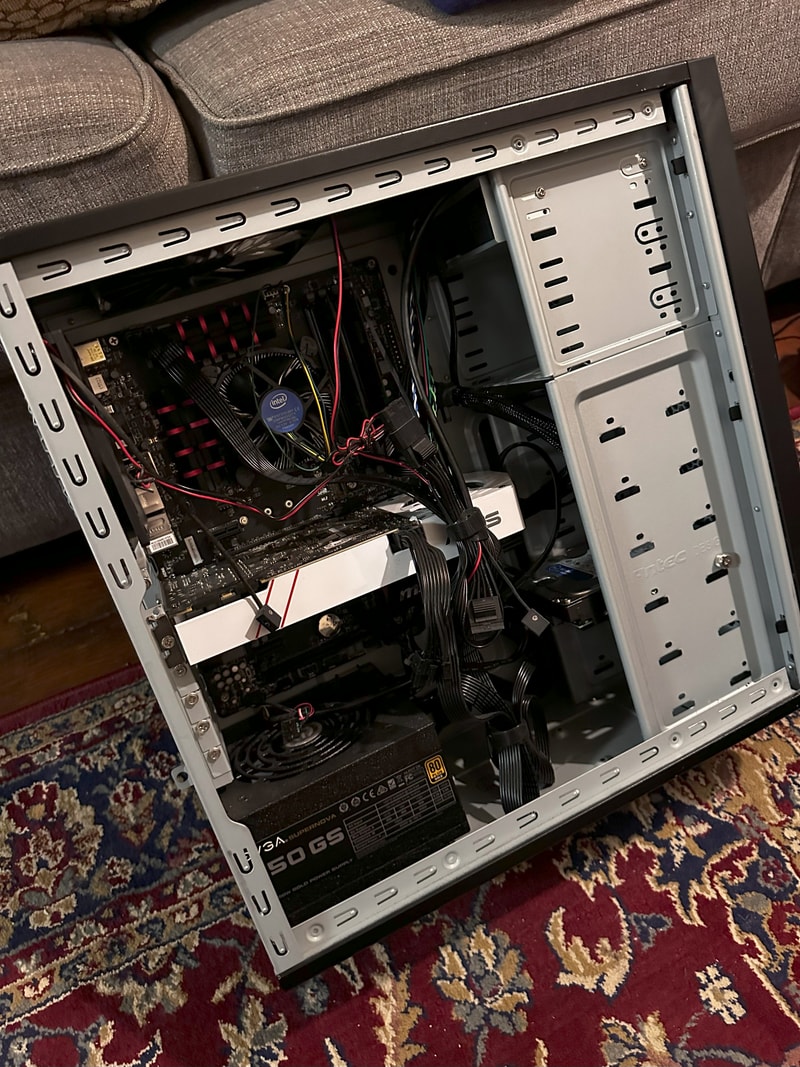
This bad boy runs an Intel i7 4790k on an MSI Z97 Gaming 5 motherboard with 8Gbs of DDR3 ram. Most importantly this board has 6 SATA III ports. Since the plan is to fill it up with drives, this is good. Unfortunately however, the lone M.2 slot uses up 2 of those SATA ports, so I won’t be able to take advantage of a free boot drive.
I’ll take these PC guts, ditch the GPU, and slap ‘em into the old Fractal Design Define R5 case. It’s an absolute behemoth, but it’s got a ton of noise dampening and a bajillion drive bays so I figure it will be perfect.
Hard Drives
Turns out you can write many articles worth of information about choosing NAS hard drives. A few factors of consideration are:
- Drive capacity
- Price $$/TB
- Warranty
- CMR vs. SMR
- RAID Level/Drive Configuration
- Choice of Boot Drive
Drive Capacity
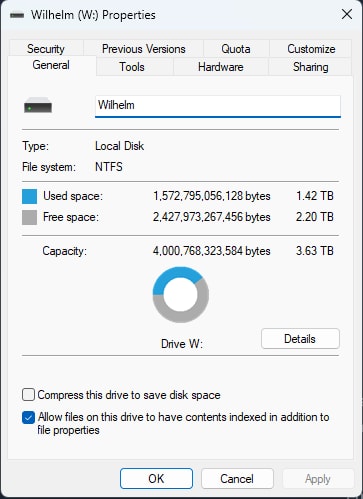
At present I am only using 1.42 TB of my primary media and backup storage on my desktop, and my music library is only about 380GBs. I currently have no plans to get into movie or tv streaming and don’t expect my storage requirements to balloon anytime soon. This made me feel pretty comfortable in saving some cash and starting out conservatively on storage. I figure 8TB of total usable space is a good place to start.
Drive Price
On the market right now Western Digital and Seagate tend to be your primary choices in drive manufacturers. As far as NAS specific drives go, Western Digital has the Red Plus (and Red Pro) and Seagate has the Iron Wolf (and Iron Wolf Pro). The Pro drives are more expensive but offer a much beefier warranty. Prices fluctuate but something in the $13-$15/TB was my target for a decent deal.
I started watching the /r/buildapcsales subreddit and made a couple IFTT alerts to notify me of new drive deals getting posted.
Warranty
A lot of people recommend getting cheaper drives by drive shucking or buying used enterprise equipment, but warranty is an important factor to me. A drive coming from an official source, with a reliable manufacturer warranty definitely adds to my peace of mind. I have yet to ever deal in the process of claiming a warranty on a failed drive though, so I can only hope when the day arrives, it’s not a mind numbing process of AI chatbots and phone trees but we do live in hell, so..
CMR vs. SMR
Something I didn’t expect to be learning about while researching, was the underlying differences between magnetic recording technologies. Conventional Magnetic Recording (CMR) and Shingled Magnetic Recording (SMR) to be specific. This article does a good job explaining the differences and why it matters, but in short, SMR is a newer method of storing data on a hard drive platter. It is able to write data tracks with slight overlaps that allows for more data density (cost savings) at the great expense to random write speeds.
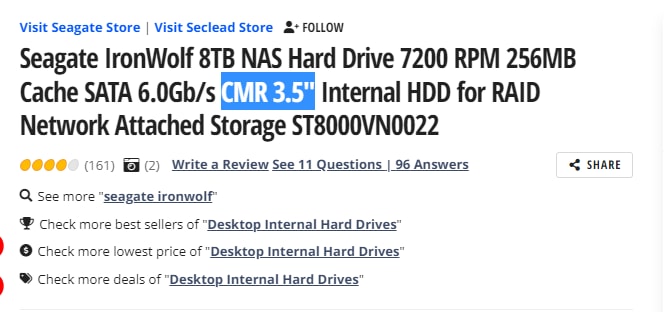

For my NAS it was all CMR or nothing.
After some legal debacles and class action lawsuits for shady behavior, most of the big players now claim to be “correctly” identifying their drives. That said, I still verified the type on the manufacturers site, the listing on Newegg, and cross checked the specific model numbers.
Redundancy
The next step is deciding what level of data redundancy I wanted to run. There is an infinite amount of discussion online about the pros and cons of every redundancy solution, but eventually I found this article. It made such an easy to follow and compelling case, I came to the conclusion to run mirrored 2 disk vdevs, over any fancy form of RAID.
Boot Drive
Last but not least, I had to decide on a boot drive. The easiest path of resistance was just taking up a single SATA port for a small SSD. If I feel the need in the future I could switch to a USB external drive to reclaim that port, or add an additional SSD if I felt the need to mirror my boot drives, but this seems like a good place to start.
Creating and restoring from automated backups is very easy in TrueNAS, and as the only impacted user is myself, I am not terribly concerned about a boot drive failure.
Final Decision
After all of that, what did I decide on?
Well, I read this wonderfully unassuming reddit thread with comments from one Bob Zelin. I had never heard of Bob before, but in this day and age you tend to take notice of someone who signs their name at the end of an internet comment. It’s a strong signal for potential grey beard knowledge, or looney toons conspiracy. I put my faith in Bob, and it hasn’t let me down yet:
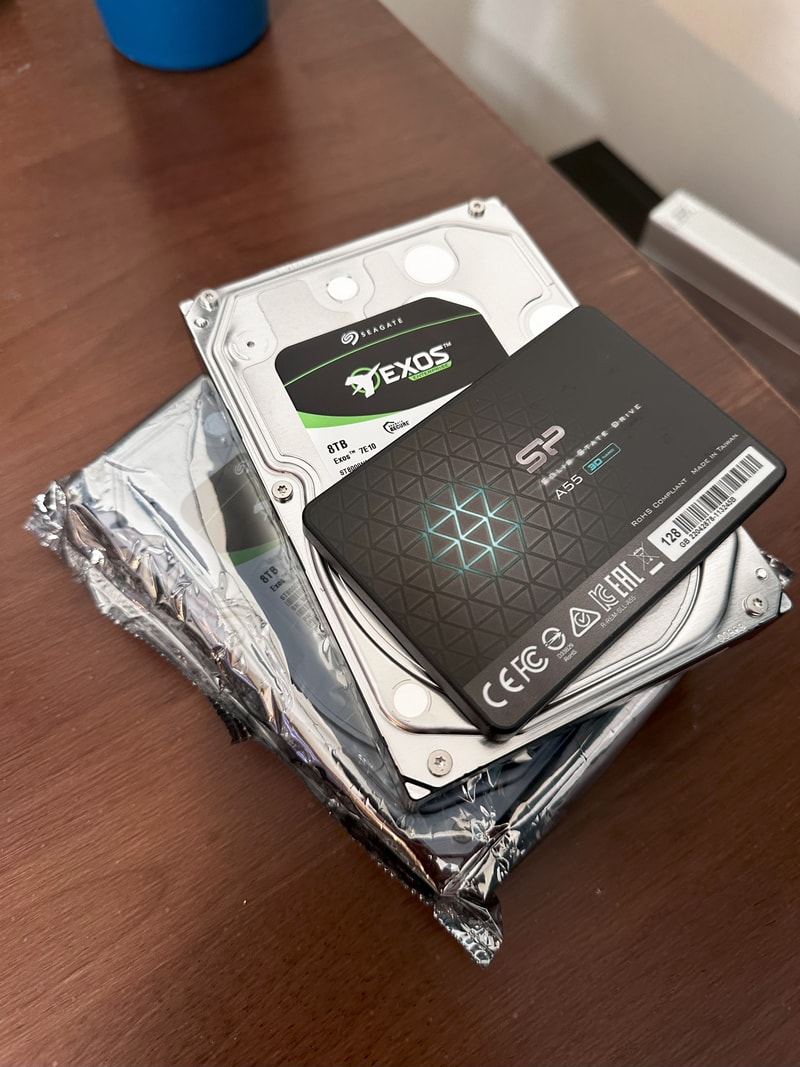
(2) Seagate Exos 7E10 8TB drives for $115 a piece
(1) Cheapest SSD I could find for $12
These Exos drives are from the Seagate Enterprise line so they offer a 5 year warranty, and if Bob is to be believed, should be just as, if not more reliable than their Iron Wolf line. At $14.375/TB I wouldn’t say I got an exceptional deal but I am more than happy. I figure that buying 8TB drives (over a smaller capacity like 4) made more sense for future proofing. As drive prices keep falling I will have room to grow my pool with more 8TB drive pairs down the road.
Something to note here is that Newegg sold these as “retail drives” but the Exos line is only sold as wholesale. They were certainly new drives, but were manufactured a year prior. I called Seagate customer service and after providing serial numbers, and proof of purchase, they prorated an extra year of warranty.
Installation Process
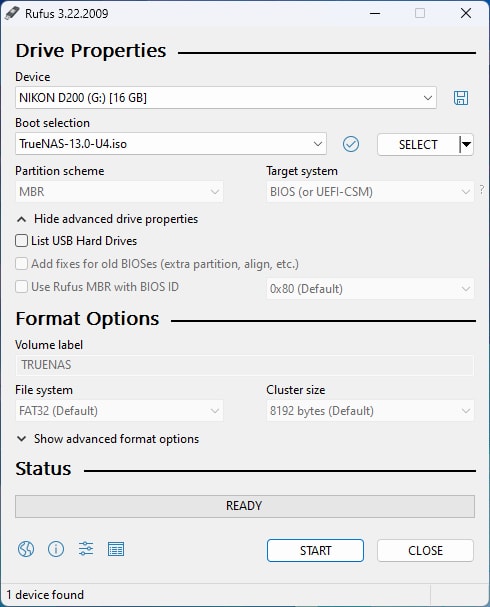
With everything all put together it was time to install TrueNAS. I chose Rufus and a random Compact Flash card I had sitting on my desk to do the job. I found the TrueNAS disk image right here.
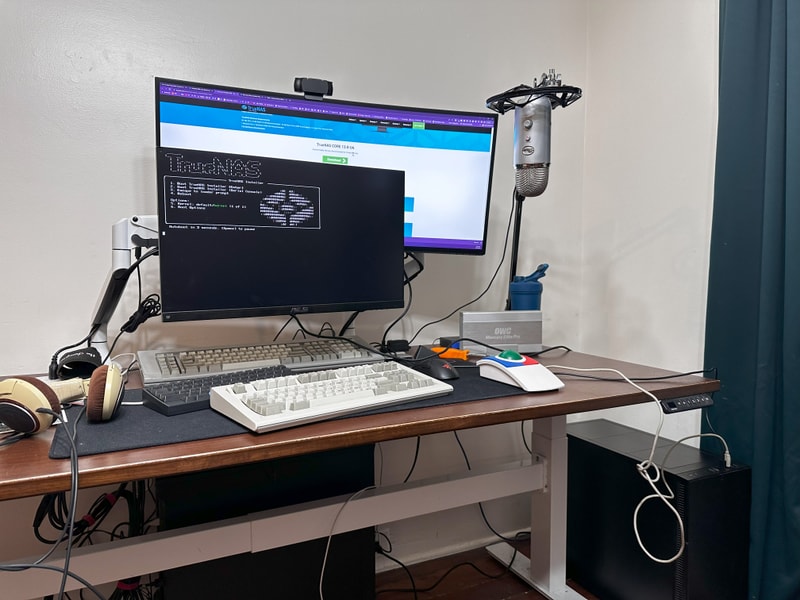
Although I broke out the CST Kid-TRAC, you haven’t the need for a mouse - only a keyboard to select install and set your password. Everything else is managed remotely through a web interface.
Installation was easy, I was able to use the defaults most of the way.
Initial Configuration
Once logged in, you get a nice looking dashboard.
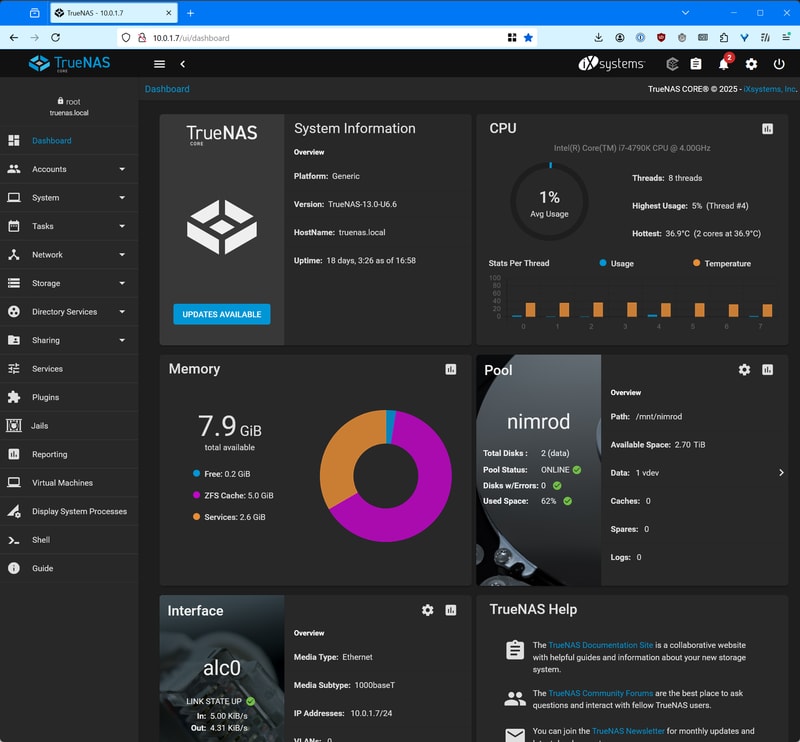
The TrueNAS documentation is incredibly solid, a big reason for going this route was how easy it was to follow their tutorials.
From here I setup my storage pool, with my single mirrored 8TB VDev, added user accounts, and made the choice to setup an SMB Share.
I could have used NFS and made life a lot easier, especially with server management and file permissions, but my primary desktop is Windows based. I chose ease of access for all of my devices, over ease of setup. One day when I get the balls to switch my desktop to Linux, I might reevaluate this choice.
Connecting from Windows
All it took was a simple net-use command:
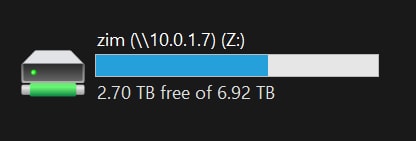
hacker voice: we’re in.
Building a Virtualization Server
With the NAS built, it was time to figure out what I was going to run all of my services on. I knew I didn’t need something ridiculously powerful. Power consumption was definitely a factor to consider, what with running this thing 24/7.
Hardware Selection
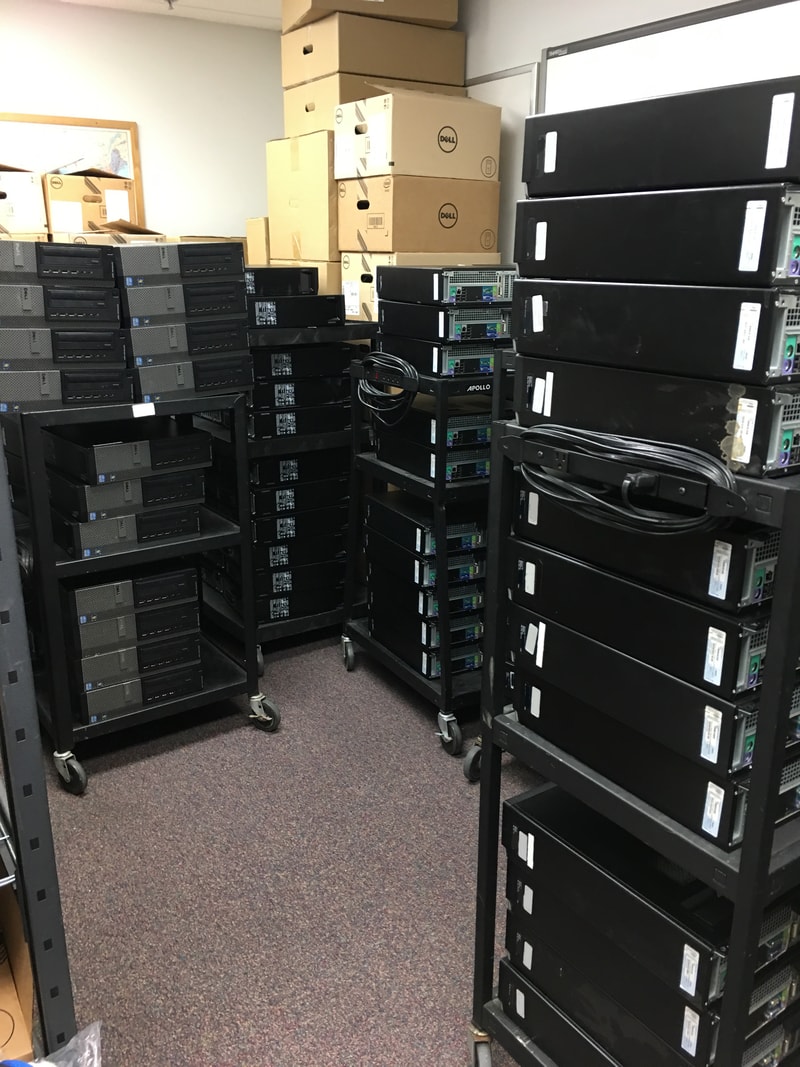
When I worked as a help desk tech I remembered we used to use these tiny small form factor Dell PCs as very capable servers and interactive displays (not pictured as I couldn’t find one, so I just grabbed a relevant photo from my time in hell - just kidding, I loved that job). I knew we frequently upgraded our systems every 3-5 years and would basically recycle our old equipment, one of those old machines would make for a perfect home server!
Micro, Mini, and Tiny
Well I guess I was right on the money with that one. This article from ServeTheHome is all about using these super capable corporate surplus micro PCs as nodes in your home lab. They are super available on eBay, Craigslist, Facebook Marketplace, and my personal favorite: ShopGoodwill for under or around $100.
Dell makes their micro PCs under the Optiplex Micro name, you can also find the HP ProDesk Mini, and the Lenovo ThinkCentre M Tiny.
Finding the Perfect Machine
It took some time to find the perfect machine, but here are a few things I considered while on my search:
This and any similar article will go out of date when it comes to prices and availability of specific models. Businesses are constantly upgrading equipment in cycles and so the new micro PCs of today will be the perfect cheap home server PC of tomorrow. In most cases these micro PCs all have easily upgradable storage and memory. The main thing I found to prioritize is getting the newest generation of processor.
At the moment there are a ton of 6th generation Intel micro PCs on the market at dirt cheap prices. These will be great servers for most use cases, but for example, I wouldn’t recommend them as strongly if you were looking to stream video. By the 8th generation (Coffee Lake) of Intel processors, QuickSync made absolutely massive gains in video transcoding.
Newer processors also tend to be more power and thermal efficient, which is a big boon for an always on server. Figure out your use case and weigh that against not paying too much for old equipment.
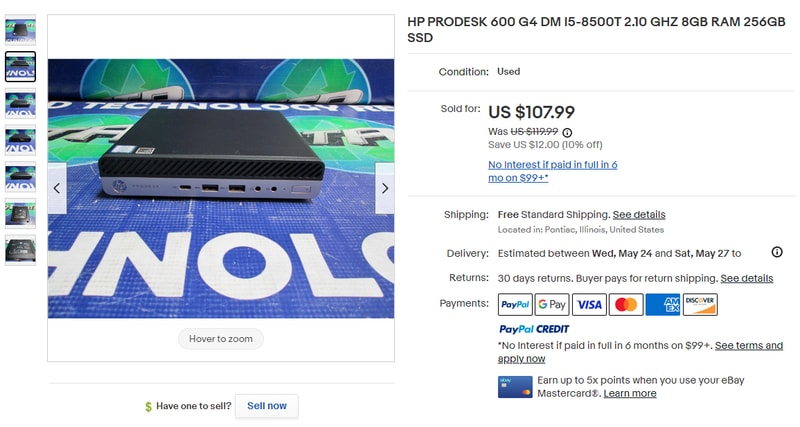
This is what I decided to pick up. An HP ProDesk 600 G4. This bad boy has an 8th Gen Intel i5-8500T, 8Gbs of ram, and a 256Gb SSD. Although I don’t have immediate plans to transcode video, the 8th gen i5 also gets a nice upgrade to 6 cores and 6 threads. My offer was accepted for $80. Perfect.
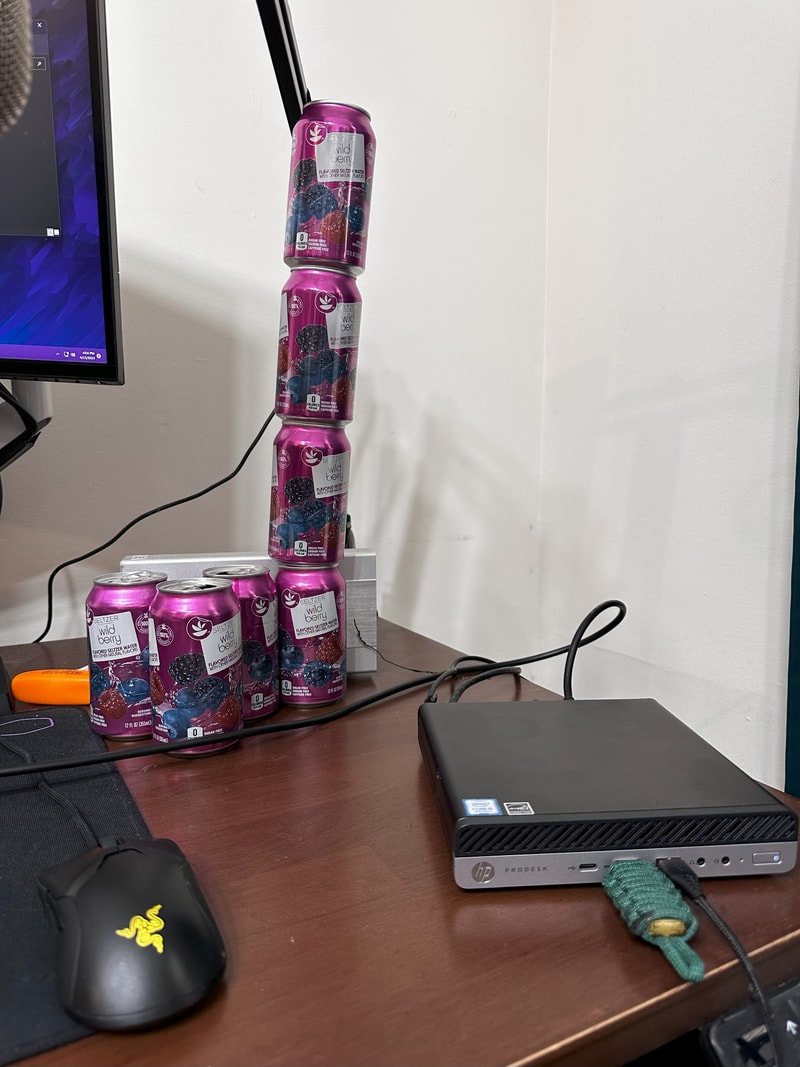
A few days later…
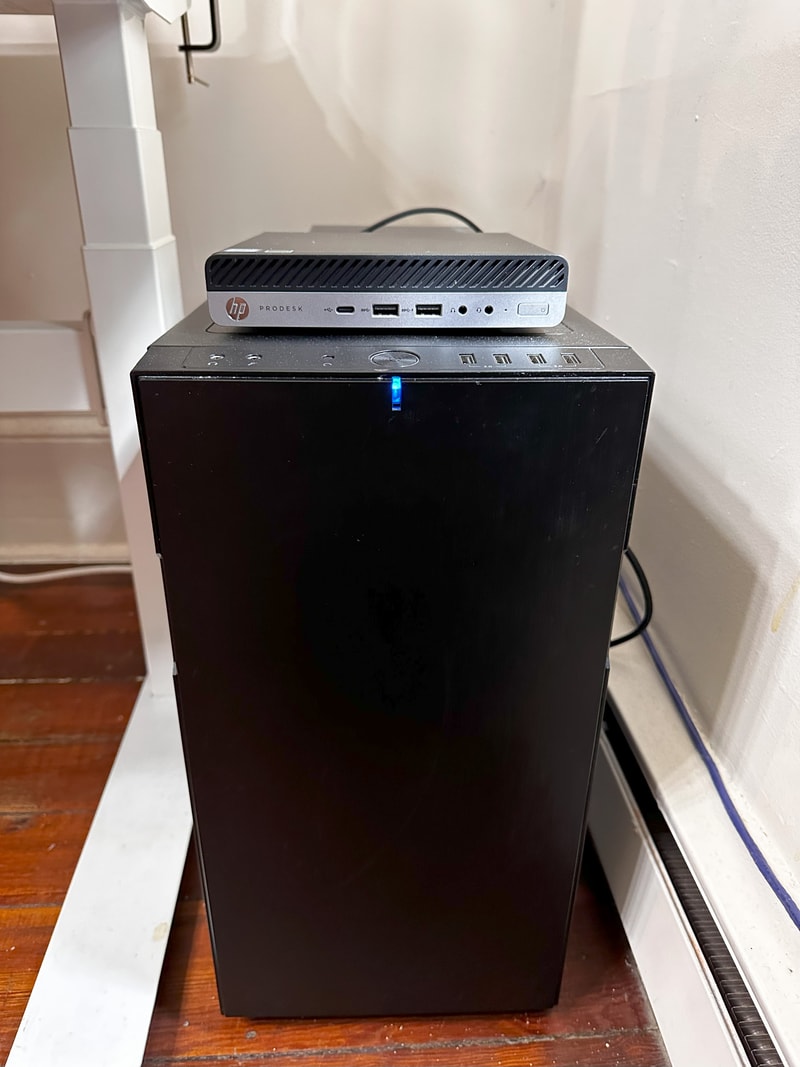
My server farm was growing!
Installing Proxmox
When it comes to open source virtualization hypervisors Proxmox is dynamite. Great documentation, a ton of online support, and plenty of years of service. This one didn’t take any mental debate like the NAS OS did. I was gonna run Proxmox.
Just like for the NAS I created a bootable USB drive in Rufus, with the latest Proxmox VE ISO.
Slapped the drive in the mini PC and booted it up. With the HP ProDesk 400 I had to follow these steps to clear the secure boot keys, and enable legacy boot support. This was a bit of an unexpected pain, but after setting the USB drive at the top of the boot priority list, I made it to the Proxmox installer.
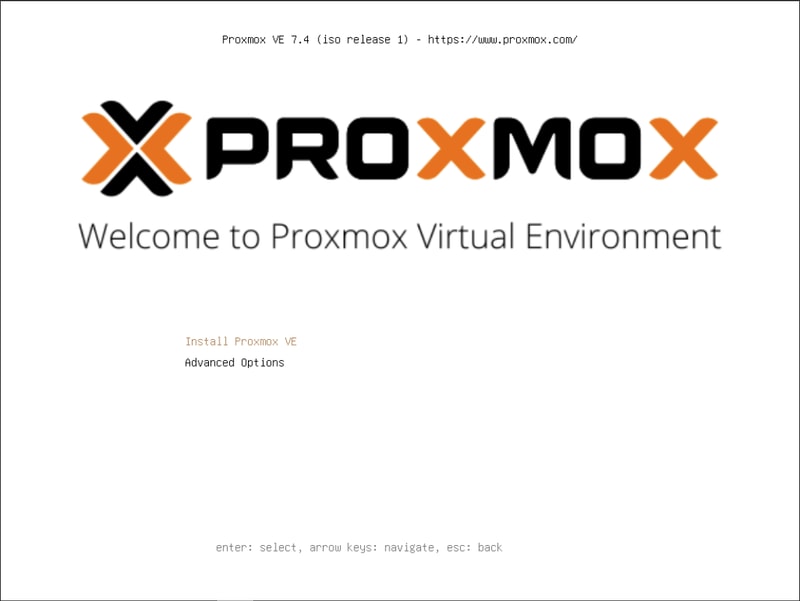
For the most part there are very suitable defaults, and although a bit daunting, everything you need to know is pretty well covered in the documentation and the forums.
Choosing which filesystem to use for the boot drive was not entirely straightforward, but ultimately I settled on using ZFS in order to take advantage of snapshot features.
The first time I reached the network configuration screen, none of the values were pre-populated. I guess my ethernet cable was not properly seated, so I fixed that and restarted the process.
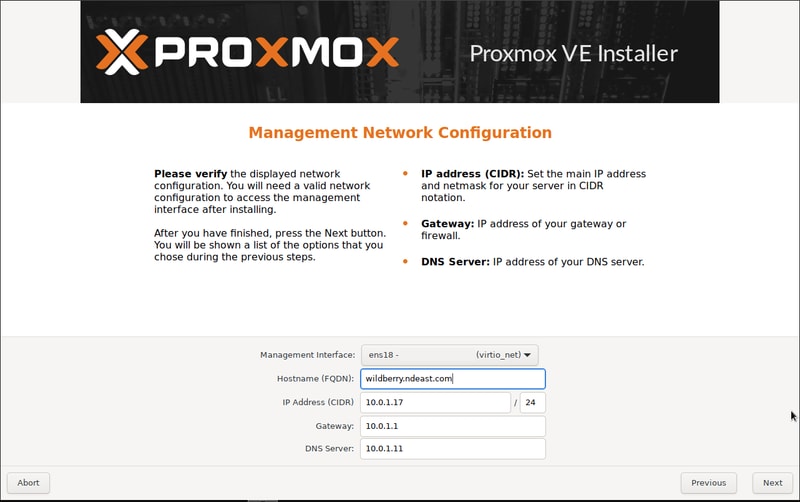
When the installer asks for a hostname, you are required to give your server a really cool and awesome name or else it won’t work. I was having a bit of a seltzer bender this night, so I chose ‘wildberry’.
After a short while it was installed and accessible via the browser!
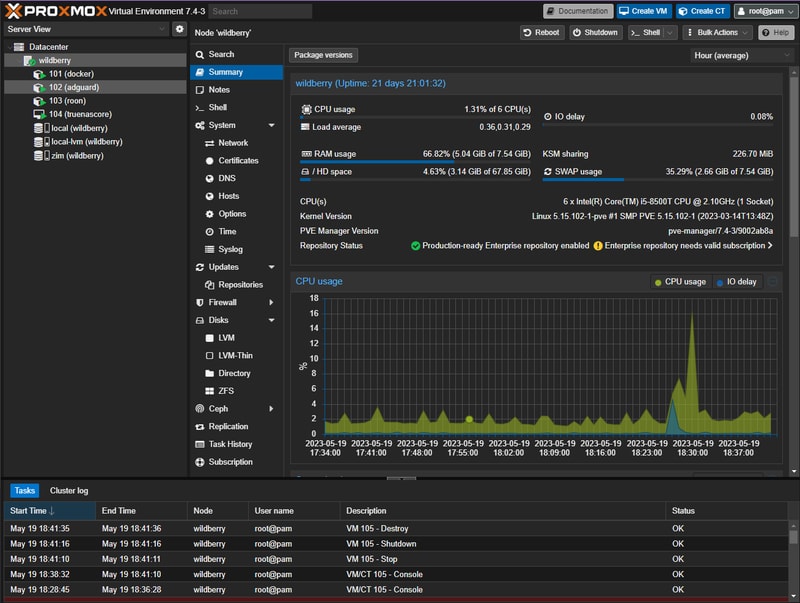
This is what my dashboard looks like after some setup.
Software Stack
To build a full Spotify replacement I was going to need to automate as much of the backend processes as possible. It seems like I came to this problem at just the right point in time, as there is an unbelievably mature ecosystem of self-hosted open source applications being developed to do just what I need.
Here is what I plan to run:
- Lidarr - manages the music library and coordinates downloads, and upgrading media
- Prowlarr - handles finding new music releases across various sources
- QBittorrent & SABnzbd - handle the actual downloading
- Plex - serves the music to my devices
System Flow
The flow will look like this:
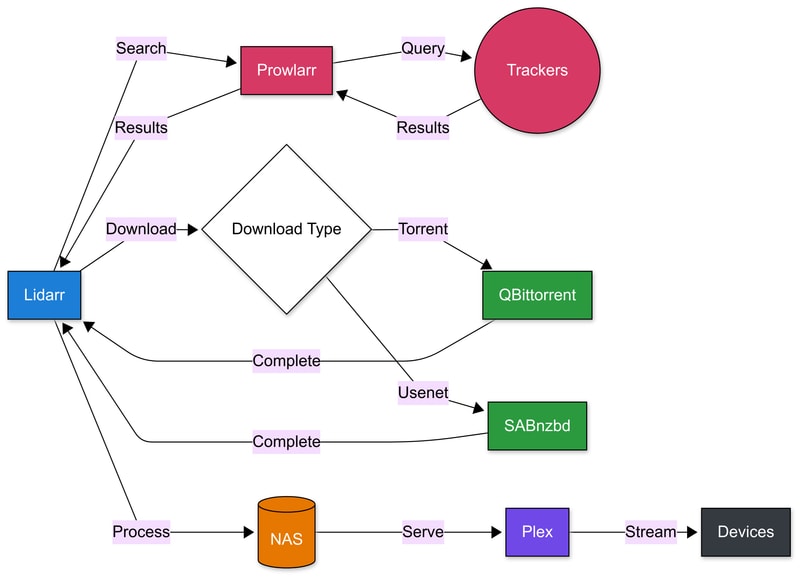
Before diving into individual application setup, I needed to decide how to host these services. While they could all run directly on the OS, there is nothing that is going to beat the simplicity and maintainability of using Docker containers. This led me to explore two main approaches.
Hosting Options
My Proxmox hypervisor was a blank slate. Do I want to run a single Linux VM for hosting all of these individual services, or should I try and containerize everything in LXC at the Proxmox level?
To complicate things further, I had an 8 terabyte elephant in the room. How was I going to give all of my services and containers access to my SMB share?
Docker-ception
As I alluded to earlier: a big part of building this system was for learnings sake itself - and I was curious to dig into Linux Containers.
As a reference I found this approach to running Docker inside LXC which really appealed to my inner Matryoshka doll.
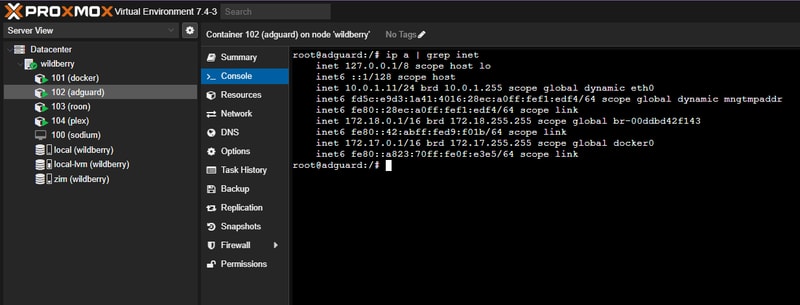
Inside of Proxmox I created a Debian 11 container with the super imaginative name: docker that would host the core of my stack.
After a significant amount of effort and research, I managed to mount my SMB share to my Proxmox host, and passed in the required directories to each container using bind mounts.
This is where I started to feel like maintainability and robustness would be an issue. I went down a path of weird guest/host UID and GID mappings, and I started to feel less like a capable home sys-admin and more like I was eating paste and chewing popsicle sticks.
That said, it still worked!
I had a bunch of independent containers each running docker, and running individual services, each accessing data on my NAS:
Reality Check
I ran this setup for about a year, and I learned a lot about what I liked and disliked. Everything was pretty robust, but each container added a lot to setup and maintenance. The ability to reboot just the Roon container when it crashed was convenient, but having to reserve a specific IP and MAC address in my router each time I wanted to host a new container wasn’t.
I appreciated the containers’ lack of overhead compared to a full VM, particularly the ability to create compact backups, and glance at resource usage. However, I found it frustrating to manage the complex directory ownership structure, where containers and services controlled various locations on both the host and NAS using mapped user IDs.
Rearchitecting
As this was my very first attempt at building a home server I knew it would also not be my last. I figured if I was ever given a reason (hopefully not catastrophic) I would take the opportunity to try the approach of building everything under one roof.
That moment arrived when I ran out of storage on the 256gb SSD. I found out that Lidarr and Plex databases will grow quite large when ballooning your burgeoning music collection.
I also made some mistakes in my initial drive formatting. If you remember earlier I said I settled on ZFS for my Proxmox boot drive? Well initially I went with ext4, and allowed it to split my drive 50/50 for its LVM-thin logical volume, and boot partition. I quickly filled up 115Gbs and without some major trickery there wasn’t an easy way to reclaim that space.
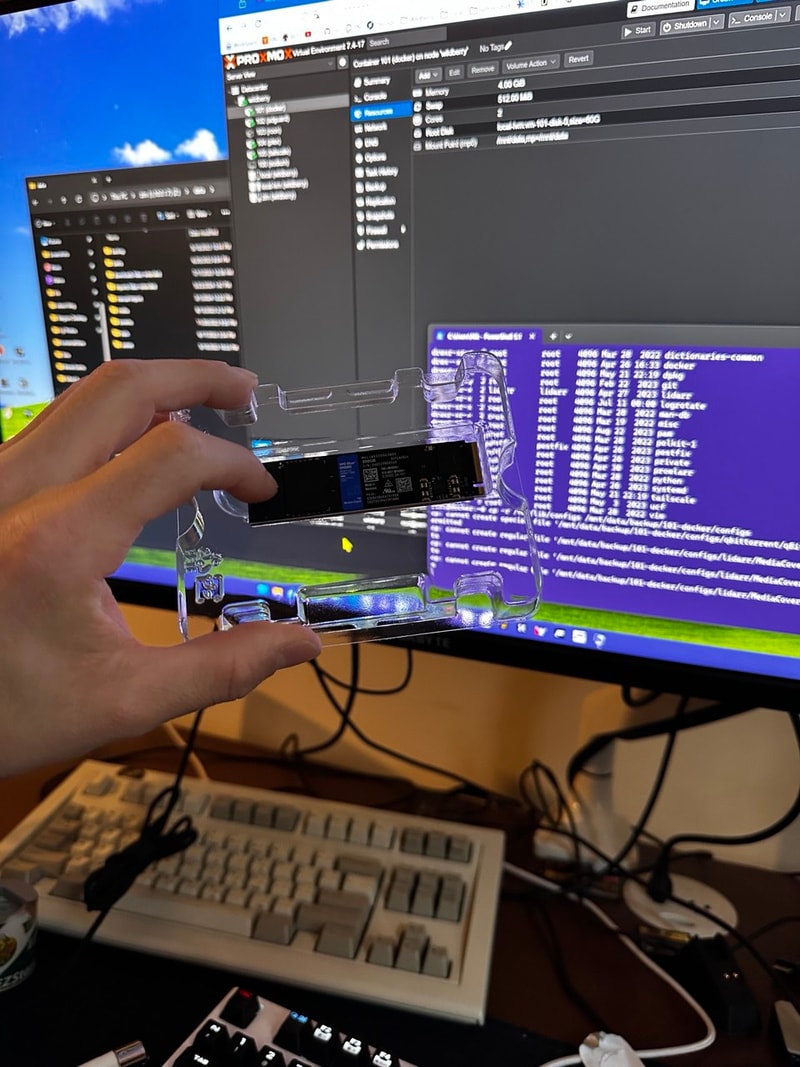
My preferred solution was picking up a 500GB Western Digital NVME drive, and starting fresh.
A Rocky Start
This time around I chose Rocky Linux as my operating system.
Running a single VM, and managing everything with a few different docker compose scripts was significantly more straightforward. I didn’t have to worry about container bind mounts, and weird user permissions. Everything was hosted under a single IP address. I was happy.
Here is what my Proxmox Environment looks like now:
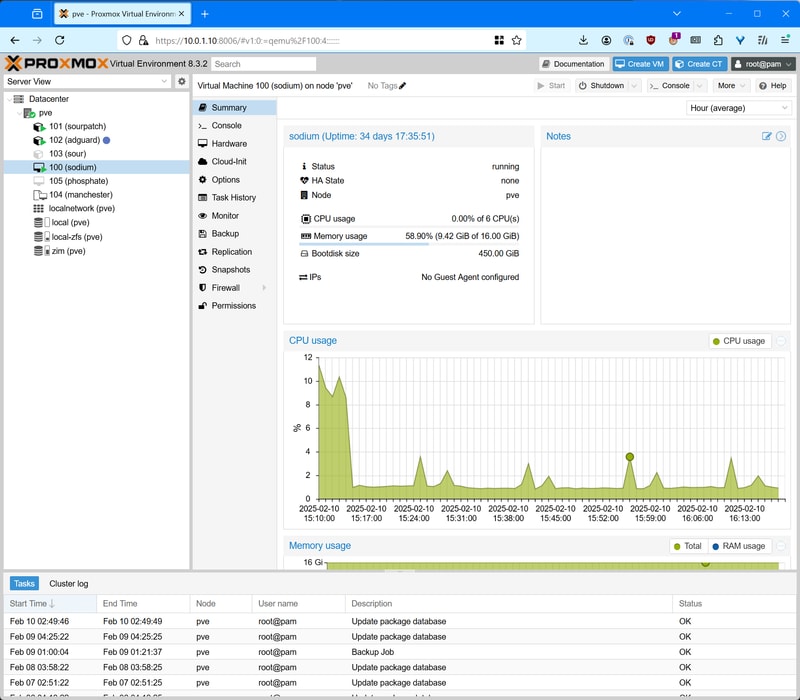
I don’t feel the need to cover too much about the initial setup of a Rocky Linux virtual machine, but the bullets are as follows:
- Rocky uses
dnfas it’s package manager - I setup my user account, copied over SSH keys
- Reserved a single IP address on my router
- Configured firewall and other miscellaneous shell settings
With our host environment ready, it was time to prepare for setting up our core services.
The Arr Apps
The Arr apps are a collection of media organizers for BitTorrent and Usenet users. Radarr handles movies, Sonarr does TV Shows, and Lidarr (what I am most interested in) deals with music. Each application will monitor torrent tracker and Usenet RSS feeds for new releases, and will track your library and attempt to upgrade the quality of your media as it becomes available. That might not sound like much, but I swear its magic.
Lidarr is great as it manages the tags and metadata of your collection. Since consistency in music metadata is such a challenging problem the solution Lidarr takes is crowdsourced. The single source of truth for Lidarr is the MusicBrainz database. MusicBrainz is an open (non-profit) music metadata encyclopedia that anyone can contribute to. They have been up and running since the year 2000, and many applications use its data.
Lidarr using MusicBrainz, as its brain, creates a symbiotic relationship of sorts. It guarantees that if metadata is broken for one user, the “fix” solves it for all users. It isn’t perfect, there is some jank, but something about contributing back to an open dataset feels really good.
Installing Lidarr and setting up the application is not entirely straightforward. The difficulty lies in how much you want to bring with you. If you have a pretty small existing digital music library, or you don’t mind completely starting fresh - this will be a significantly easier process. If however you have a large digital music library like I do, with inconsistent tags and folder structure, then you will require some prep work.
A Tangent on Seeding Torrents
Before I can begin to explain the folder structure I use on my NAS, I want to explain some abstract concepts around seeding torrent files.
In order to continue seeding a torrent after you have downloaded it, the hash of the underlying data has to match with that of the torrent file. This means the data you share has to be exactly the same as the data you originally received. In the context of downloading a legally obtained video file for example, as long as the file remains in your downloads folder with the same name, you can watch it all you want, as well as continue uploading it to other BitTorrent users.
Now what if you wanted to move that file out of your downloads folder into your media library, maybe even rename it?
Well, by using a hard link, you can create multiple file names that point to the same underlying chunk of data. This means your 14GB video file can reside in your torrent client download folder, as well as neatly renamed in your Plex Media folder - simultaneously - while only consuming one files worth of storage.
For audio things are a little different. In a perfect world everyone who rips a royalty free music CD will properly tag said MP3 or FLAC files with a full and consistent set of data, that the entire populous can agree on. In the nightmare world we live in, this rarely happens. Since ID3 and FLAC tags are embedded into the actual audio files, even if you use a hard link, you are changing the underlying data by rewriting your tags.
Fix the data = corrupt the torrent
This leaves you with two paths:
- You can simply not retag your audio. Hard link your files and import everything as-is into your library without corrupting the torrent. This will eventually turn into a sort of masochistic hell of misfit songs.
- Copy and retag on import. This duplicates the file on disk so you are using double the storage space for every torrent, but your tags are neatly in order.
The choice is yours.
Get My Data Right
I prefer to defer to the brilliance of those who have walked the path before me. Without the documentation and tutorials created by TRaSH Guides and posted on the WikiArr, I would have likely fallen into many pitfalls during this journey.
The first step was creating a proper folder structure - one that would support atomic moves and hard links, allowing for efficient file management between my download client and media server.
Create a Folder Structure
I’m starting with a folder structure based on TRaSH Guides’ recommendations for Docker setups. Here’s what I’ve settled on:
data
├── downloads-lidarr-extended
|   ├── complete
|   └── incomplete
├── manual-import
├── media
|   ├── ebooks
|   ├── movies
|   ├── music
|   ├── music-unmapped
|   └── tv
├── torrents
|   ├── ebooks
|   ├── misc
|   ├── movies
|   ├── music
|   └── tv
├── trash
└── usenet
    ├── backup
    ├── incomplete
    └── complete
       ├── music
       ├── movies
       └── tv
While folder names are fairly flexible (data vs share or tv vs television) I am sticking with lower case to maximize compatibility.
It might be a bit optimistic for me to include ebooks. I‘ve barely read a single book in the past decade (working on it), but I figure maybe seeing an empty folder will guilt me into some form of twisted motivation.
The structure is designed to be future-proof - as long as I properly pass these folders to my containers, expanding the tree later shouldn’t be an issue.
The Great FLAC Wars
Once at the forefront of all internet forums a battle was waged. Ideologies clashed, fingers bled and eardrums burst. Although not as prevalent as it once was, the world wide web still hasn’t stopped smoldering. So much as one single mention of lossless audio in a comment on Hacker News will bring out headphone collectors and degenerate audiophiles from across the globe to relive the glory days. The question is: Can you hear a difference between FLAC and MP3??
This is a solved question: the primary value of FLAC/lossless audio is for archival purposes. Lossless audio provides the flexibility to be transcoded and manipulated without quality loss, whereas working with lossy MP3s leads to compounding quality degradation with each conversion.
While writing this article, I realized how attached I’d grown to my iTunes library. Despite its quirks – the pervasive duplicates that no modern audio player would tolerate – I had spent years building it up in that familiar, if broken and dated, interface. From the ill-fated iTunes Ping to the infamous U2 album, this library had truly seen it all.
I had to bite the bullet.
The whole point of building this as a self hosted streaming platform was that modern network connections and processing power allow us to seamlessly transcode music streams on the fly with ridiculous efficiency.
This means FLAC/Lossless files will be the basis of my collection moving forward, and any duplicate MP3s will be deleted. Prioritizing bitrate above all else, I would kick iTunes to the curb. Lidarr would handle upgrading the rest of my lossy into lossless.
To the best of my ability I am going one by one and deleting duplicate albums by hand. I’ve only got 30,000 songs and ~2500 albums. After all these years together, using a script feels too cold and callous - I owe my library the diligence of a manual click-shift-click-delete.
Tagging
Have you ever been kept up at night, pondering how on earth your Sansa e130 knew that Weird Al Yankovic released White and Nerdy in 2006? That would be thanks to music tags. Metadata all about your individual music files. MP3 files use the ID3 standard, and FLAC files have their own tagging system referred to as FLAC tags or Vorbis Comments.
Having clean and consistent tags across your music library is important to keep things from spiraling out of control. If you are unfamiliar, ask someone born before 1993 to describe LimeWire on their family computer circa 2003.
For Lidarr to recognize my library, each file would have to be accurately named, organized, and tagged.
I thought this would be easy. I thought it would be the simplest procedure in the world. I had no idea this was going to take over a week of trial and error to get right!
Beets or Picard
When looking for means of tagging a large music library, I came across two really solid options:
Both are open source and cross platform but Picard is GUI focused and Beets is all command line.
As I wound up tagging (and re-tagging) my library 3 or 4 times during this process I can safely say that both applications are fantastic and will accomplish the same end result.
I found that Picard does a better job at quickly (read: takes less initial effort) tagging an existing library, while Beets can also serve as an incredibly powerful music library management software.
When I am simply tagging a large library that requires a lot of human intervention, I really feel like the GUI that Picard offers makes things easier. If I had to do this all over again, I would stick with Picard.
If my end goal wasn’t to use Lidarr for management, I‘d probably just use Beets. There is an insane amount of extensibility and customization available, that I haven’t even scratched the surface of.
Tagging With Picard
Making a Back Up
Before starting, make a complete backup of your library. By this point in my process, I had several copies across multiple drives - having learned from past mistakes, I wasn’t taking any chances.
For my final run, I was tagging a local copy of my library with the intent to copy it to my NAS once complete.
Initial Library Import
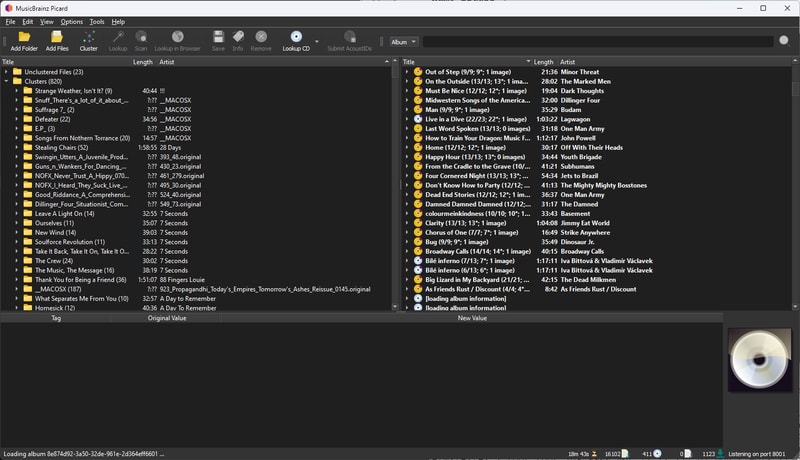
- Select
Add Folder, to import your music directory. You can import multiple folders at once, or handle them separately as needed. Then: - Click the
Unclustered Filesdirectory and theClusterbutton to sort files into album folders - Select your
Clustersdirectory and clickLookupto match albums with the MusicBrainz database
For large libraries, this process might take a while.
Handling Matches and Mismatches
Once everything has been looked up, begin reviewing the identified albums to fix any partial matches or mistakes. Common issues include:
- Duplicate files or tracks
- Misidentified releases (e.g., remaster vs original CD)
- Missing track files
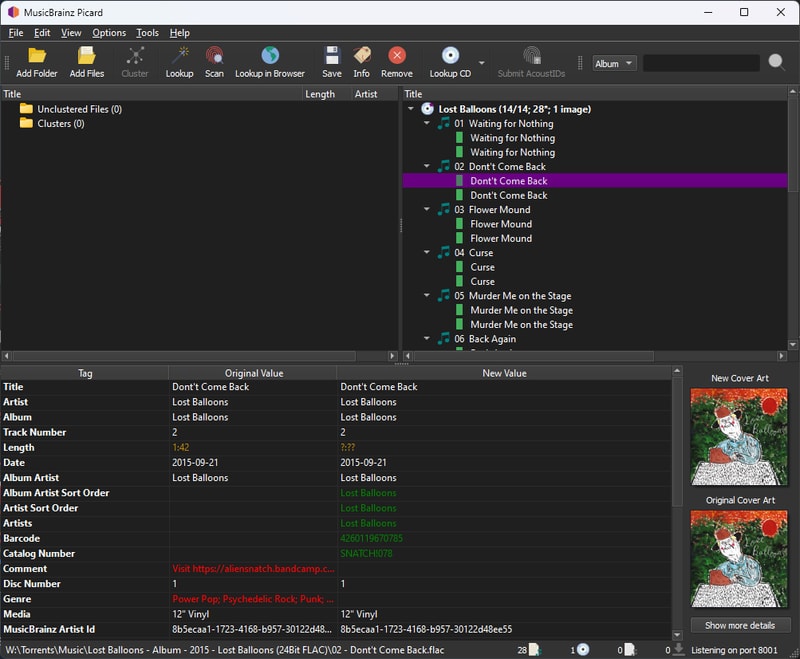
Here’s an example from my library: an album correctly identified but with duplicate files - 24 Bit and 16 Bit FLAC versions. Even though there is hardly any reason to store the extra file size, I will follow my precedent, and delete the 16 Bit files, via File Explorer.
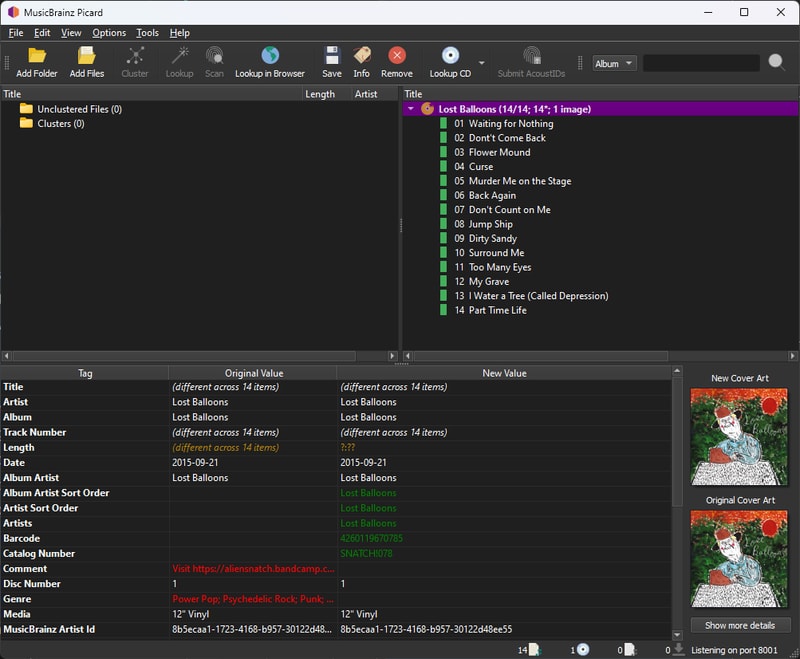
And now our album is gold and Picard is happy.
Depending on how good your tags are, and how mainstream your library is, this might be a very long and tedious process.
Working with MusicBrainz
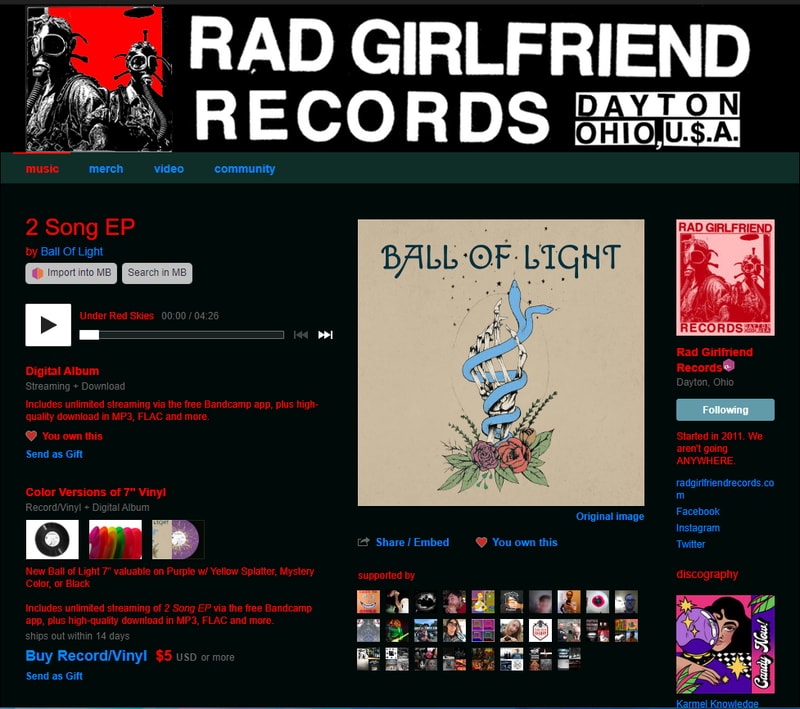
Let’s look at adding a new release. In this example, I’ll use an EP by Ball of Light that I purchased from Bandcamp.
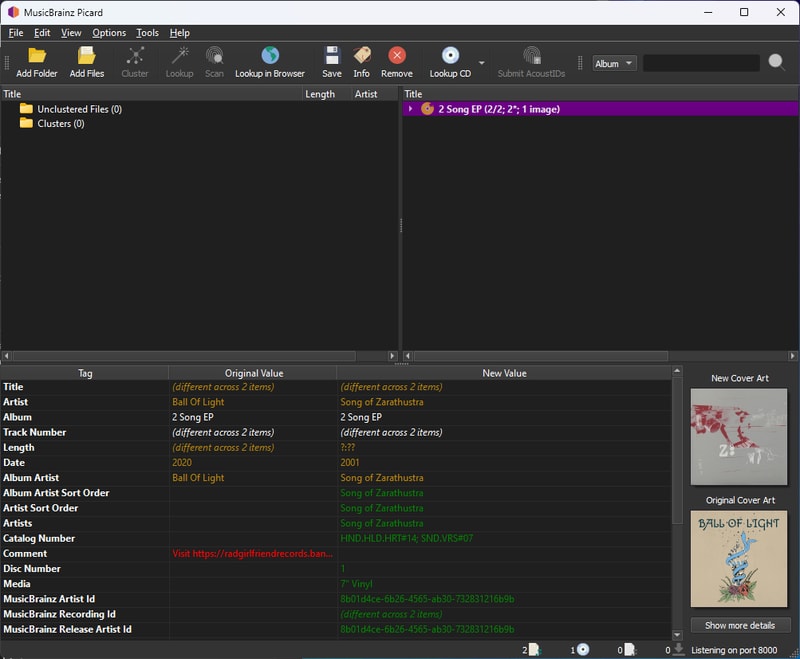
Picard inaccurately identified this release, but this also applies to releases that Picard doesn’t recognize at all:
Installing Userscripts
Manually entering all of the artist and album data into MusicBrainz would get old real fast. Especially when there are plenty of music services out there that likely already have the metadata on your unidentified release.
The first thing you will need to do is install a userscript browser extension. I use Violentmonkey on Firefox/Chrome, but there are a bunch of different options out there like Tampermonkey and Greasemonkey.
Next check out this list of MusicBrainz user scripts and install the Discogs and Bandcamp import scripts.
Adding a New Release
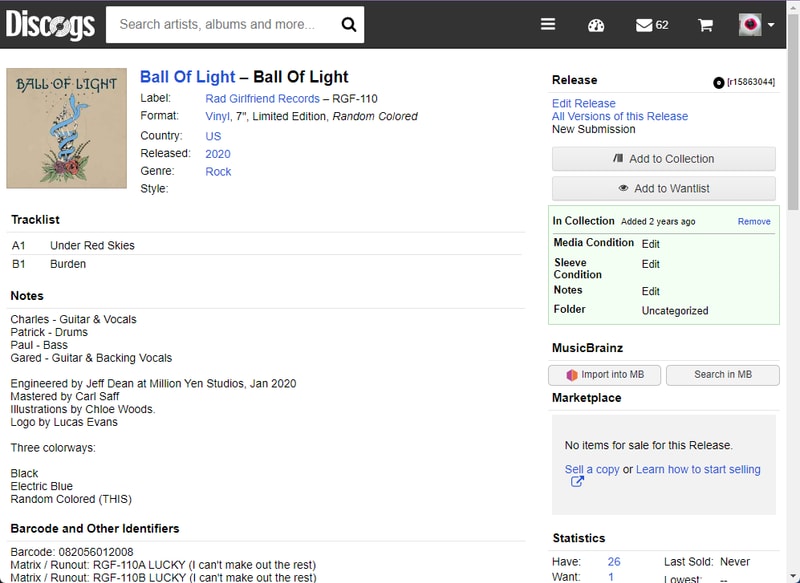
Although MusicBrainz has no idea about this release, Discogs knows all about it. With our user script installed, we have a neat little import into MB button in the right column.
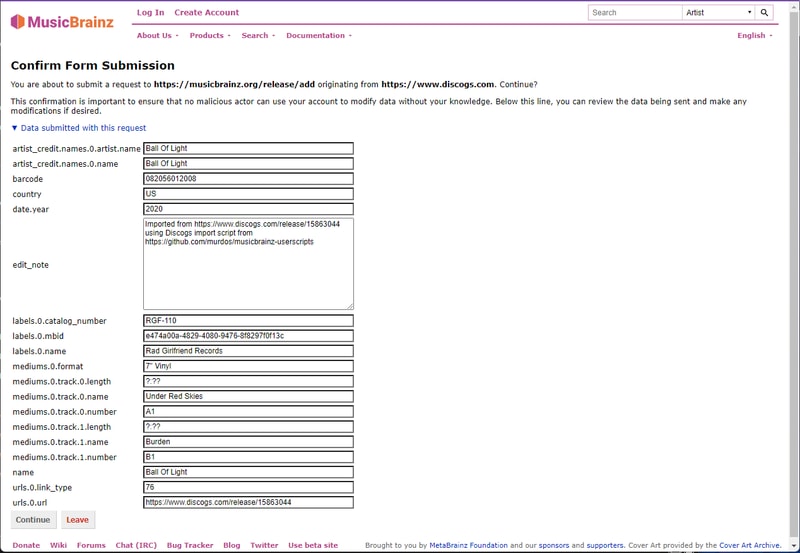
Click that button and you will be re-directed to confirm your MusicBrainz submission prepopulated with all the relevant album information.
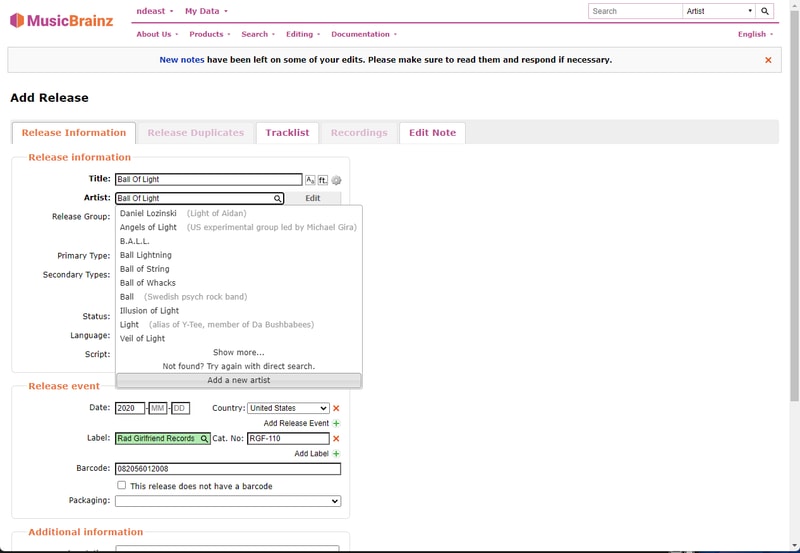
Adding an Artist
On the Add Release form you need to make sure that the Artist and Label field are verified (turn green). In this case Ball of Light was not an artist known to MusicBrainz, so they needed to be added.
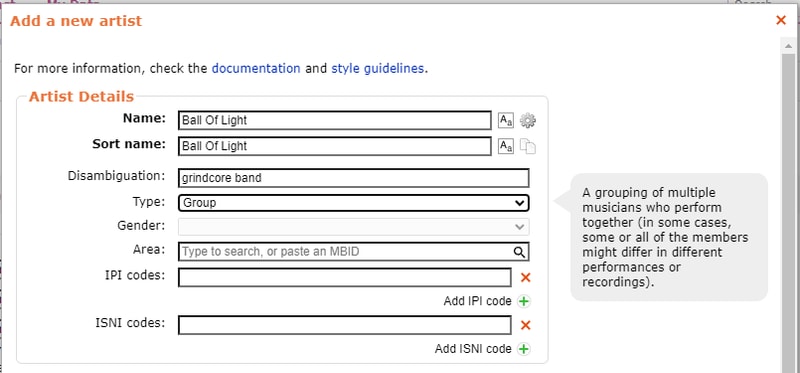
I try and add as many details as I can verify about the band or artist, but if you can’t find much information or just want to get something entered, only Name and Sort Name are required. I would recommend adding a Disambiguation if you can. Just enough of a descriptor to differentiate.
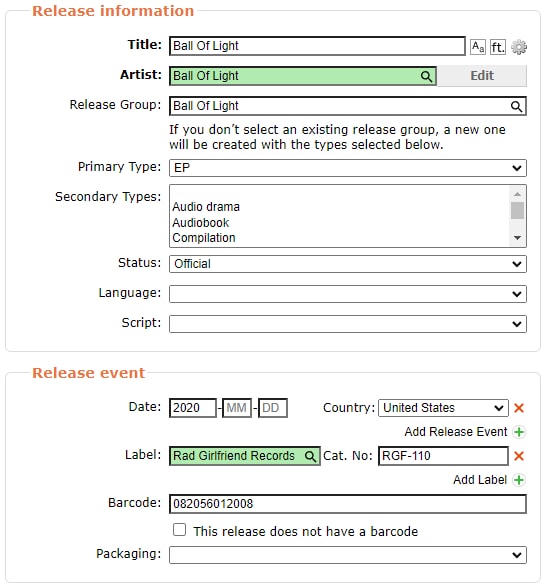
Back to the release information, click the magnifying glass again and select the one you just created (it might require try again with a direct search).
Setting Release Types and Status
This is important: Make sure that you set a Primary Type and a Status.
By default and what I imagine will be most peoples Lidarr configurations, only Official Albums, EPs, and Singles get tracked.
If you can’t figure out why Lidarr isn’t seeing a MusicBrainz release, checking both of these fields should be your first step. Remember this is a community process - you can fix existing releases that are improperly categorized.
Label and External Links
Verify the Label. You might have to enter a new one if the record label doesn’t already exist. If the album was self released you can enter [no label].
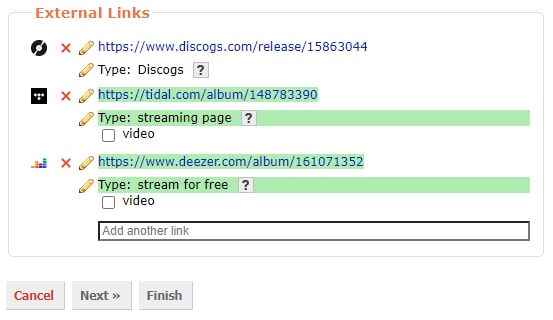
Although it isn’t required to get a release seen by Lidarr, it is nice to add streaming service links under the External Links heading. Copy the album share URL from Tidal, or the web URL from Deezer, and paste them in.
Click next and verify the track names and numbers look right and then click Finish.
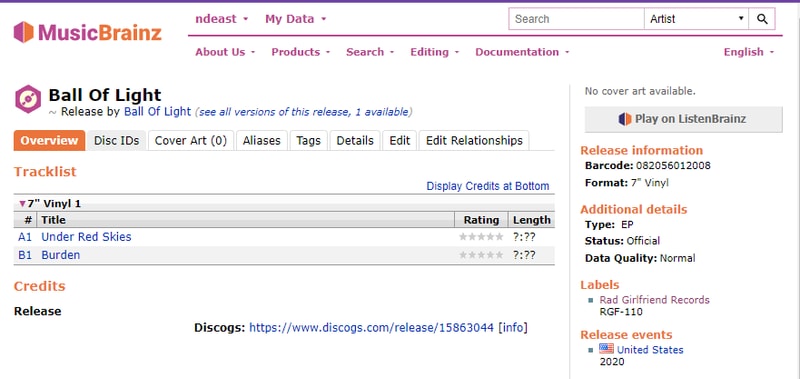
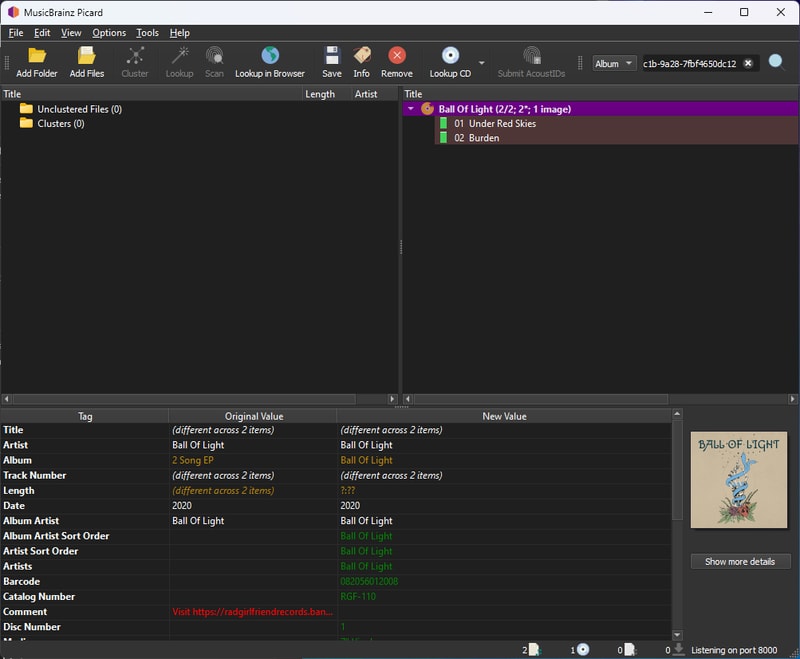
Now when we lookup our release in Picard again we see it has been properly recognized and can be retagged. Picard usually updates pretty quickly after making a change to the global MusicBrainz database.
Handling Unmapped Files
After several days of tagging, I was left with a handful of problematic releases. These included weird split releases, bootleg recordings, and releases with confusing artist aliases. While I plan to properly tag these eventually, I needed a temporary solution.
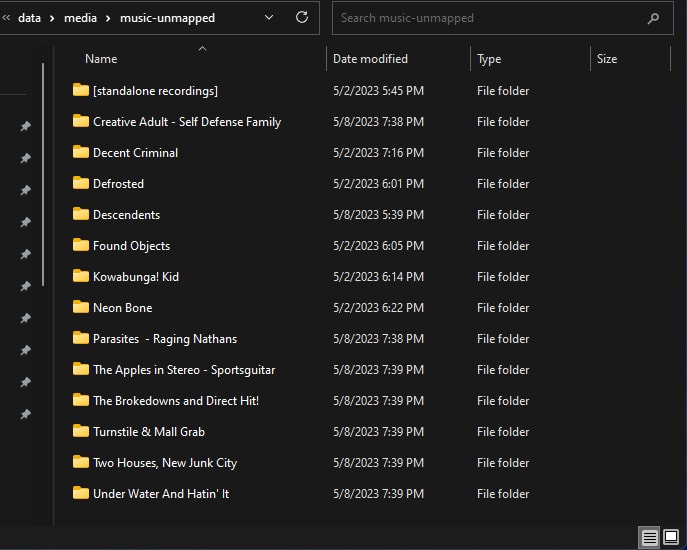
My approach was to create a music-unmapped directory in my NAS media folder. This folder could be added to my music player, but not imported into Lidarr - keeping the music available but not managed. Eventually I will go back and fix these releases, but after a week of tagging, I was ready to move on.
Configure File Naming
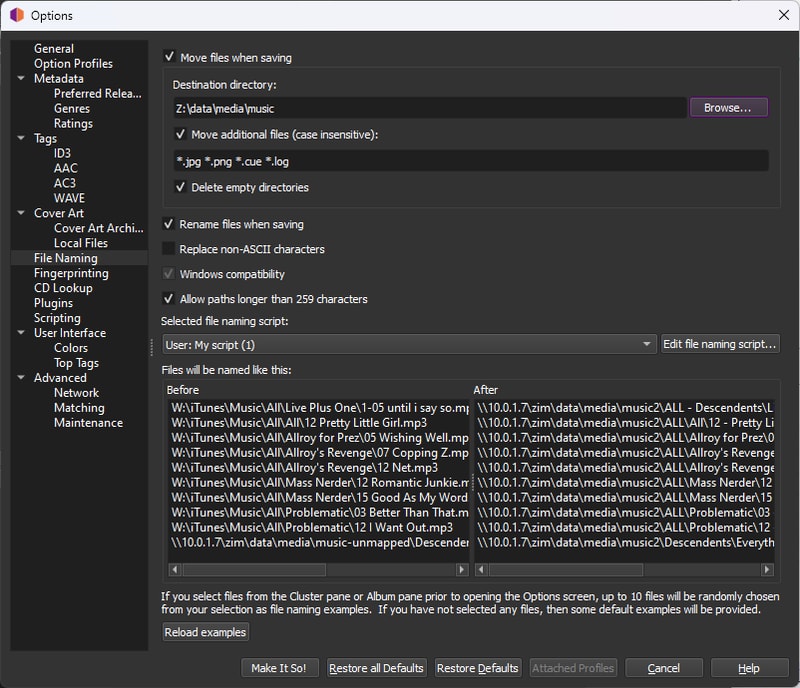
The next step is to write your tags. Navigate to Options>Options and select File Naming on the left hand side.
Here you can choose if you want to move all of your music files to a new directory (I recommend this instead of modifying in place, keeps it cleaner), and whether to move additional files. I added the common file extensions to bring along my album art and log files.
Choose the Rename files when saving option and then click Edit file naming script...
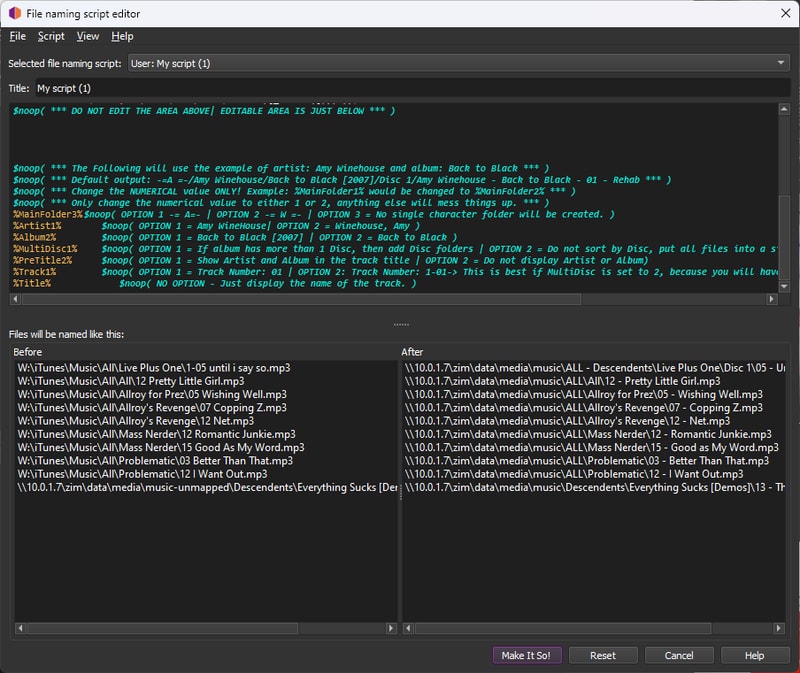
The MusicBrainz community has created several useful naming scripts. Since we’ll be able to adjust naming conventions again in Lidarr later, we just need something simple that Lidarr can understand for the initial import. I chose to adapt this script by FragaGeddon, which produces paths like:
'\artist\album\disc:0\{track:00} - track'
'\Buzzcocks\Singles Going Steady\03 - I Don’t Mind.flac'
$noop( *** DO NOT EDIT THE AREA BELOW | EDITABLE AREA WILL BE AT THE VERY BOTTOM *** )
			$set(MainFolder1,-= $upper($left(%albumartist%,1)) =-/)
			$set(MainFolder2,-= $upper($left(%albumartistsort%,1)) =-/)
			$set(MainFolder3,)
			$set(Artist1,$replace($rreplace(%albumartist%,[_:*?"<>|],-),?,)/)
			$set(Artist2,$replace($rreplace(%albumartistsort%,[_:*?"<>|],-),?,)/)
			$set(Album1,$replace($rreplace(%album%,[_:*?"<>|], -),?,)$if(%date%,$if(%album%, )[$left(%date%,4)])/)
			$set(Album2,$replace($rreplace(%album%,[_:*?"<>|], -),?,)/)
			$set(MultiDisc1,$if($gt(%totaldiscs%,1),Disc $num(%discnumber%,1)/)
			$set(MultiDisc2,)
			$set(PreTitle1,$replace($rreplace(%albumartist% - %album% -,[_:*?"<>|], -),?,))
			$set(PreTitle2,)
			$set(Track1, $num(%tracknumber%,2) - )
			$set(Track2, $num(%discnumber%,1)-$num(%tracknumber%,2) - ))
			$set(Title,$replace($rreplace(%title%,[_:*?"<>|],),?,))
$noop( *** DO NOT EDIT THE AREA ABOVE| EDITABLE AREA IS JUST BELOW *** )


$noop( *** The Following will use the example of artist: Amy Winehouse and album: Back to Black *** )
$noop( *** Default output: -=A =-/Amy Winehouse/Back to Black [2007]/Disc 1/Amy Winehouse - Back to Black - 01 - Rehab *** )
$noop( *** Change the NUMERICAL value ONLY! Example: %MainFolder1% would be changed to %MainFolder2% *** )
$noop( *** Only change the numerical value to either 1 or 2, anything else will mess things up. *** )
%MainFolder3%	$noop( OPTION 1 -= A=- | OPTION 2 -= W =- | OPTION 3 = No single character folder will be created. )
%Artist1%			$noop( OPTION 1 = Amy WineHouse| OPTION 2 = Winehouse, Amy )
%Album2%			$noop( OPTION 1 = Back to Black [2007] | OPTION 2 = Back to Black )
%MultiDisc1%		$noop( OPTION 1 = If album has more than 1 Disc, then add Disc folders | OPTION 2 = Do not sort by Disc, put all files into a single folder. )
%PreTitle2%		$noop( OPTION 1 = Show Artist and Album in the track title | OPTION 2 = Do not display Artist or Album)
%Track1%			$noop( OPTION 1 = Track Number: 01 | OPTION 2: Track Number: 1-01-> This is best if MultiDisc is set to 2, because you will have 2 track numbers as 01 - *track names*, etc. )
%Title%				$noop( NO OPTION - Just display the name of the track. )
Writing Tags
Once you have that customized to your liking, check out the Tags heading on the left column.
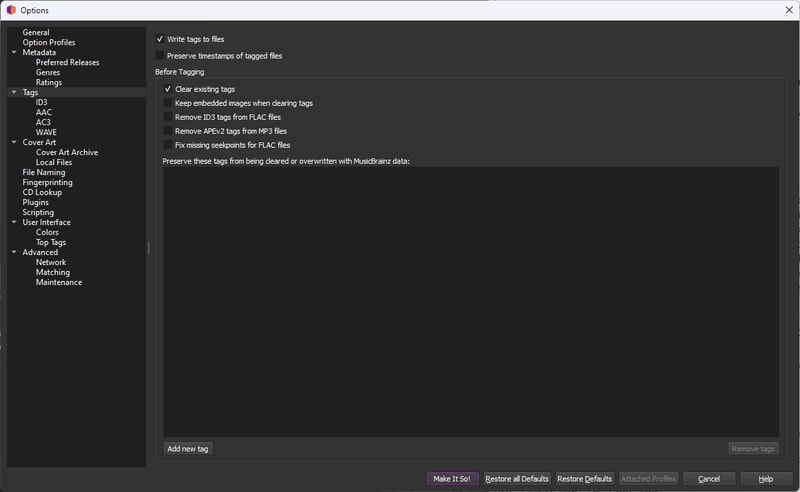
Make sure Write tags to files is checked, and while I don’t know if this is entirely necessary I also chose to clear existing tags.
Click Make it So to save your changes.
Before committing changes to your entire library:
- Test the
Savebutton on a single release - Verify the folder structure and file naming
- Confirm album art and tags are properly populated
- If everything looks correct, select all releases (
Ctrl+A) and clickSave
Be prepared to wait - processing a large library can take considerable time.
Final NAS Copy
With my NAS directory structure finalized, and my music library thoroughly tagged, I had to copy everything everything over from my local machine.
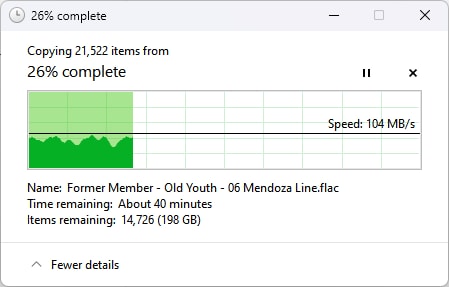
This was going to take a little while, but we had plenty to do in the mean time.
VM Configuration
Let’s hop back into our virtual machine.
Mounting My NAS
While my music library copied over we needed to do a bit of house keeping on the Rocky side.
I need to create a user and a group that will take ownership of my NAS data. Setting up solid access controls from the start would save me a lot of headache down the line when multiple containers and software processes are attempting to read and write to the library.
I created a data user and group with the id of 101006, like so:
$ useradd -u 101006 dataThe significance of the UID is related to my previous attempt at Proxmox LXC bind-mapping, but otherwise I could have made it anything.
Next I need to get my NAS (formally known as zim) mounted.
To mount SMB shares on Rocky Linux, we need to install the cifs-utils package:
$ dnf install cifs-utilsMounting a network drive requires the user credentials I setup in TrueNAS. Thankfully the cifs.mount command will let me pass in a credential file, so I don’t have to type them out every time:
$ vi /etc/zim-credentials

username=<nas-account-username>
password=<nas-account-password>
At this point I could manually run the mount command, and access my NAS, but what if I wanted to automate this? By editing the /etc/fstab file we can get Rocky to mount zim every time it boots.
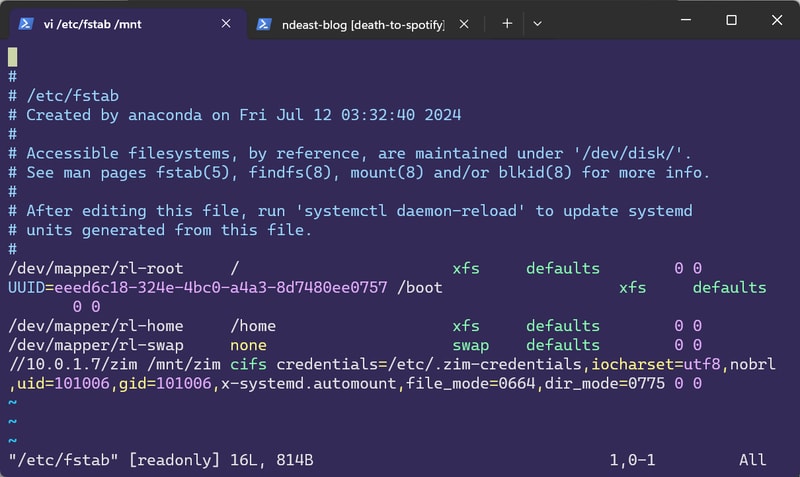
//<NAS IP ADDR>/<DATASET>/path/to/data /mount/path cifs credentials=/path/to/credentials,iocharset=utf8,nobrl,uid=<UID>,gid=<GID>,x-systemd.automount,file_mode=0664,dir_mode=0775 0 0To try and break some of these options down:
- The first argument specifies the SMB network share
- The second argument is the location of the mounted drive. Typically placed under
/mnt cifstakes my credentials file as an argumentnobrlspecifies not sending byte range lock requests - Apparently Lidarr struggles with file locksuidandgidcorrespond to that of ourdatauserx-systemd.automountensures our drive will be mounted on boot- Finally I set my file and directory modes to
664and775respectively
I find my way out of vim, save the file, and run mount -a to see if it worked.
Thankfully - no errors - and ls /mnt/zim/data returns my folder tree!
I gave my system a quick reboot, and sure enough, zim was mounted and ready to go, without any intervention.
Setting Permissions
By this point all of my music files had copied over to the NAS.
Although I set file and directory modes when mounting zim, I would need to make sure all of my files reflected the right ownership, and permissions.
I gave ownership recursively over the entire data directory:
$ chown -R data:data /mnt/zim/dataThen I recursively modified all the file permissions:
$ chmod -R a=,a+rX,u+w,g+w /mnt/zim/dataBoth of these commands expectedly took a little while to run, but now all of my files were owned by data:data, directories were 775, and files were 664.
Understanding Docker
One benefit of running each of our applications in Docker containers is the isolation each service gets from the host. In case of there being a vulnerability in the Lidarr software, we hope that at most an attacker would only be able to gain access to the sandboxed environment, and not our entire machine. We can further limit the scope of each application, by running them as separate user accounts, only given access to the files they need to operate.
Starting with lidarr, I made user accounts for each of my application stack, and added them to the data group.
$ useradd -m lidarr && usermod -aG data lidarrEach service requires a configuration folder where all of its preference and application data lives. As I learned during my container experiment, by keeping application configs in one place, it’s very easy to backup and restore application state in the future.
This time around I made a directory in my home folder called .docker-configs, inside I created directories for each of my applications. I gave ownership to the corresponding user account and changed the permissions to 744 - this would give write and execute access exclusively to the owning account and read access to everyone else.
nikolas in 🌐 sodium in ~
❯ exa -lag --header .docker-configs/
Permissions Size User        Group       Date Modified Name
drwxr--r--@    - lidarr      lidarr      14 Feb 23:36  lidarr
drwxr--r--@    - plex        plex        14 Jul  2024  plex
drwxr--r--@    - prowlarr    prowlarr    14 Feb 23:36  prowlarr
drwxr--r--@    - qbittorrent qbittorrent 24 Oct  2024  qbittorrent
drwxr--r--@    - sabnzbd     sabnzbd     24 Oct  2024  sabnzbd
Docker Image Repos
I feel incredibly spoiled with the resources available to burgeoning home sys-admins these days. The infrastructure built for free by so many talented and passionate people is exceptional, and it’s so easy to use! A perfect example of this are container image repositories - think of them as app stores for Docker containers, where maintainers package up applications with all their dependencies so they “just work” when you download them.
Organizations like Linuxserver.io and hotio.dev have done the hard work of creating and maintaining these pre-configured Docker images for just about every self-hosted app you can imagine, including all of the Arr apps. Instead of figuring out how to install and configure each application yourself, you can simply pull their ready-to-use container image and be up and running in minutes.
Docker Compose
Instead of executing our containers one by one from the command line, we are going to use Docker Compose so that we can pre-define our services in a yaml file and easily control them all at once. Each application has it’s own docker compose definition that we will need to populate with our own parameters. Let’s look my Lidarr config from linuxserver:
---
services:
  lidarr:
    image: lscr.io/linuxserver/lidarr:latest
    container_name: lidarr
    environment:
      - PUID=1007
      - PGID=101006
      - TZ=US/Eastern
    volumes:
      - '/home/nikolas/.docker-configs/lidarr:/config'
      - '/mnt/zim/data:/data'
    ports:
      - 8686:8686
    restart: always
If you have been following along to this point we have been prepping to fill in these values for what seems like ages now.
In the environment block we set the Lidarr user account id, and the data group id. These values allow the linuxserver (and similarly for hotio) images to run as a non privileged user inside of the container. $ id lidarr will list the uid and gid if you forgot.
Your TZ identifier can be found on this page.
The volumes section is a little tricky. Here we are mapping directories on the host machine to directories inside of the container. Applications running inside of the container can’t automatically see the entire host file system, they require a specific folder to be passed in as a volume. The format is: /host/path:/container/path.
Lidarr needs to have access to our entire NAS data directory, since it will be interacting with files from our download clients, as well as the files in our media library. In my example I also pass in the configuration directory I created under .docker-configs. If I were to open a file explorer inside my container, I would see two directories labeled /data and /config. The files inside each directory exist and are fully editable on both the host and within the container, just with different relative paths.
Under ports we can define network port mappings between the container and the host. This will determine how we access the web interface. Similar to volumes, we are making a port on our host available to our container. The format is host_port:container_port. If you have overlapping services or wish to change the port your application runs on you will have to make the update in the application, as well as change this mapping in your compose file. The default, and requirement for the first boot of Lidarr is 8686.
Finally I set my container to restart: always as I am confident in the configuration and always want Lidarr spinning up when my server starts. For the time being while troubleshooting, you might want this set to restart: unless-stopped so you don’t find yourself in a loop.
Bundling Services
The great part about docker compose is that you can add multiple containers into one file. I like to group my services based on what I want to run together, and run my docker compose command by specifying specific compose files.
I created another directory in my home folder called .docker-compose where I keep them safe. I bundled all of my backend services together in a file called arr.yml and my Plex container in plex.yml:
nikolas in 🌐 sodium in ~/.docker-compose
❯ exa -lag --header
Permissions Size User    Group   Date Modified Name
.rwxr-xr-x@ 2.8k nikolas nikolas 22 Nov  2024  arr.yml
.rw-r--r--@  579 nikolas nikolas 22 Nov  2024  plex.yml
Here is an example of my arr.yml file with the Prowlarr service added:
name: arr
services:
    prowlarr:
        container_name: prowlarr
        ports:
            - '9696:9696'
        environment:
            - PUID=1008
            - PGID=1008
            - UMASK=002
            - TZ=US/Eastern
        volumes:
            - '/home/nikolas/.docker-configs/prowlarr:/config'
        image: ghcr.io/hotio/prowlarr
        restart: always
    lidarr:
        container_name: lidarr
        ports:
            - '8686:8686'
        environment:
            - PUID=1007
            - PGID=101006
            - UMASK=002
            - TZ=US/Eastern
        volumes:
            - '/home/nikolas/.docker-configs/lidarr:/config'
            - '/mnt/zim/data:/data'
        image: ghcr.io/linuxserver/lidarr:latest
        restart: always
Note how each container only receives the specific volumes the application requires. Prowlarr has no need to access our data, and thus it only has a config directory passed in.
Pull-Up
I found it easiest to setup each service one by one, and I will start with only Lidarr for now.
As I was going with the multiple docker-compose file route, we needed to specify which file to execute by adding the -f flag:
docker compose -f ~/.docker-compose/arr.yml pull
This command will pull the Lidarr docker image, and it is also how you will update your containers in the future.
Once that completes, you are ready to go:
Finally run docker compose -f ~/.docker-compose/arr.yml up and you will see the log output of your container spinning to life.
Lidarr Setup
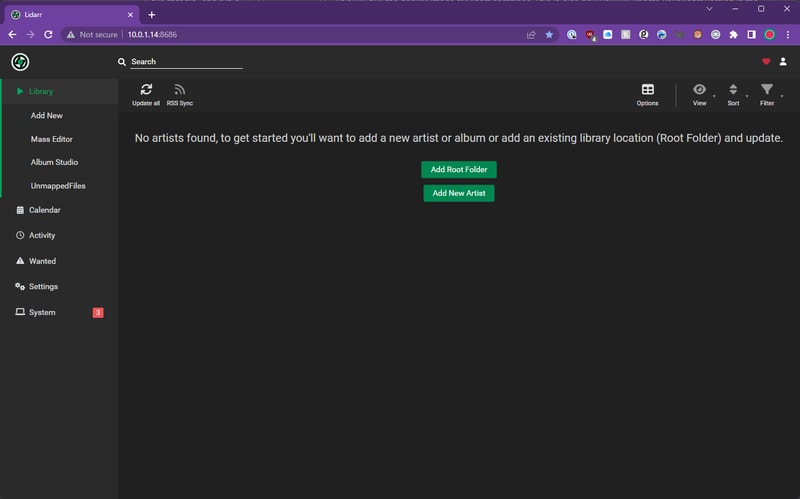
To access the Lidarr application, we netscape navigate to our Rocky IP address at port 8686, where we are presented with a fresh install of Lidarr. Before we add our library, we need to set some important settings.
Media Management
Track Renaming
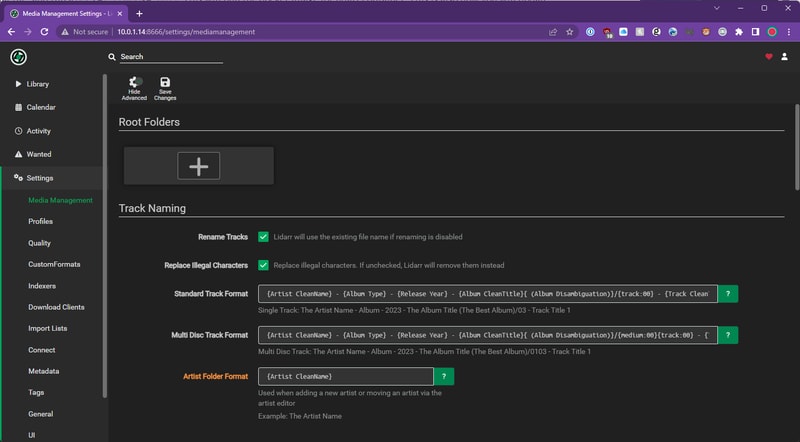
Head to Settings > Media Management and check the Rename Tracks box. This allows Lidarr to manage our library folder structure.
One shortcoming with the track renaming script I used when tagging my library with Picard, was that it did not incorporate any artist or album disambiguation. This caused some problems with specific artists and albums in my library.
Take this band forgetters as an example. They released an EP and an LP, both self-titled. So without any album type or disambiguation, Picard dumped all of the tracks into a single folder. This was pretty messy.
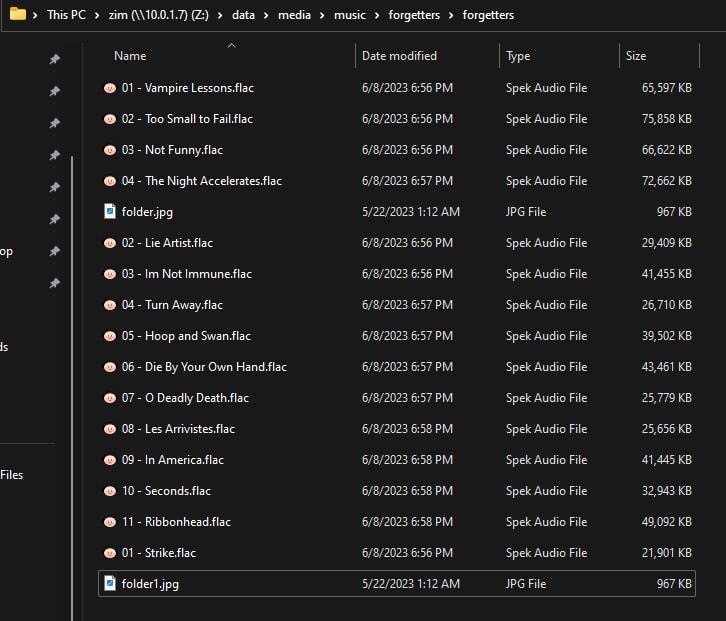
Even before Lidarr came into the picture, this was also presenting issues downstream for my music players. Roon for example had no clue how to handle this:

To solve this, we will add a few extra fields to our album folder names. I have adopted the TRaSH Guides suggestion for track formatting (also found in Lidarr-Extended’s optimal settings - where I stole it from).
Standard Track Format: {Artist CleanName} - {Album Type} - {Release Year} - {Album CleanTitle}{ (Album Disambiguation)}/{track:00} - {Track CleanTitle}

Multi Disc Track Format: {Artist CleanName} - {Album Type} - {Release Year} - {Album CleanTitle}{ (Album Disambiguation)}/{medium:00}{track:00} - {Track CleanTitle}

Artist Folder Format: {Artist CleanName}
Now our albums look like this - so even when the EP and Album are released in the same year, they are differentiated.
Folder Settings

These options just help keep your folders clean. I recommend checking them both.
Import Settings
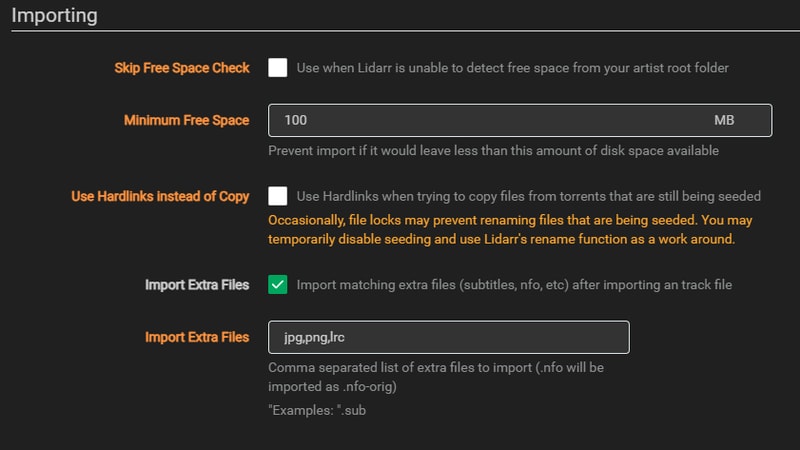
Under the Importing heading I uncheck the option to use hard links as I will be taking the route of duplicating my storage requirements in order to preserve torrent seeding. This means each music file will exist in both my download location and my media library. While this uses double the storage space, it ensures I can continue seeding while maintaining a clean, properly tagged media library.
Check the box to import extra files, and add the common image extensions so you can bring over album artwork. I also choose to bring over lyric files with the .lrc extension.
Unfortunately at the present moment, moving extra files doesn’t appear to be working in Lidarr, and hasn’t for some time. For now I have resorted to having Lidarr embed album artwork into each file when tagging instead. Really hope that fix gets merged one day.
File Management
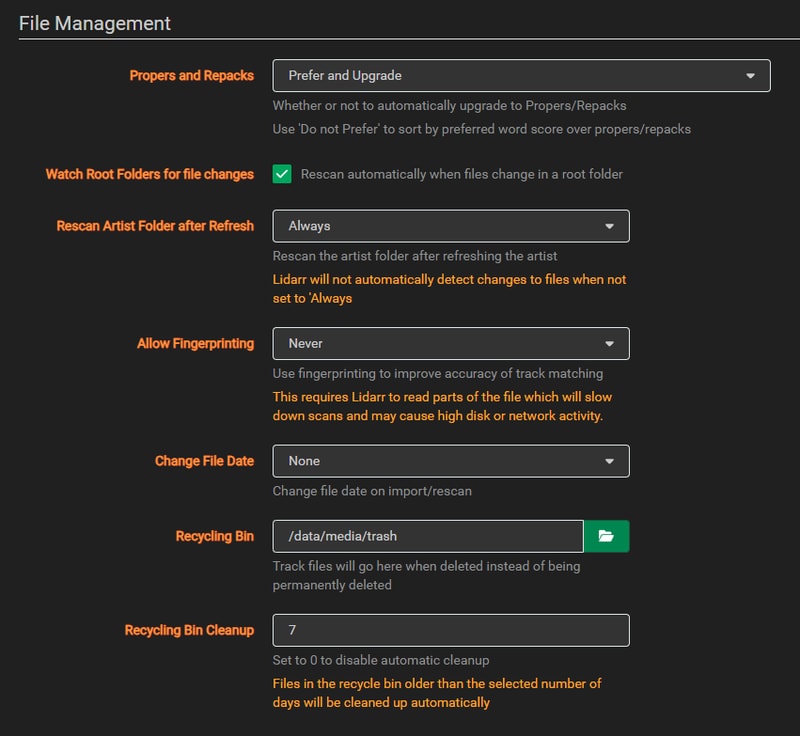
Under File Management I set Allow Fingerprinting to Never. I found this slowed down importing, and over all I haven’t seen a need for fingerprint track matching. I also created a trash folder on my NAS and set the location under Recycling Bin. Just in case Lidarr starts going crazy, anything it deletes will go into this folder for 7 days.
When initially importing your library, you might find that Lidarr is in a never ending bid to scan your Artist Folder. If you are still working through cleaning up your library of unmapped files, it might be worth disabling Watch Root Folders and setting Rescan Artist Folder after Refresh to Never.
There will still be an artist folder refresh that happens every 24 hours, but at least you won’t accidentally trigger it.
Profiles
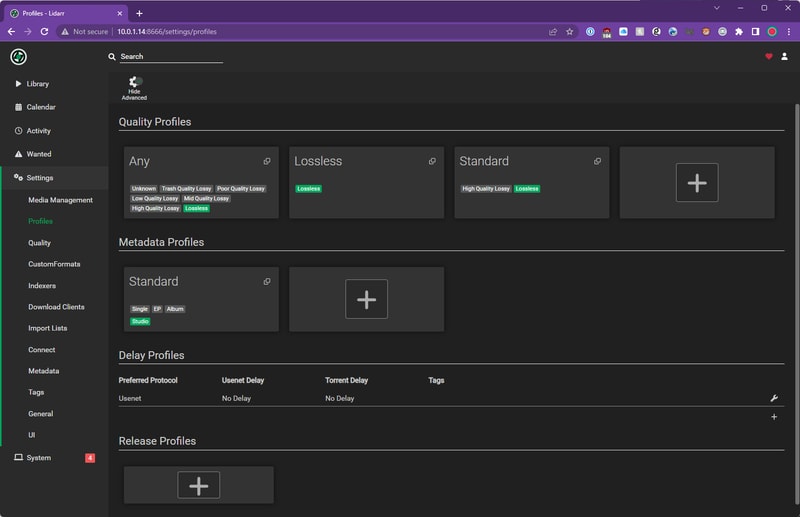
In the Profiles section we define the quality of our library which are also the rules Lidarr follows to upgrade a release.
Quality Profile
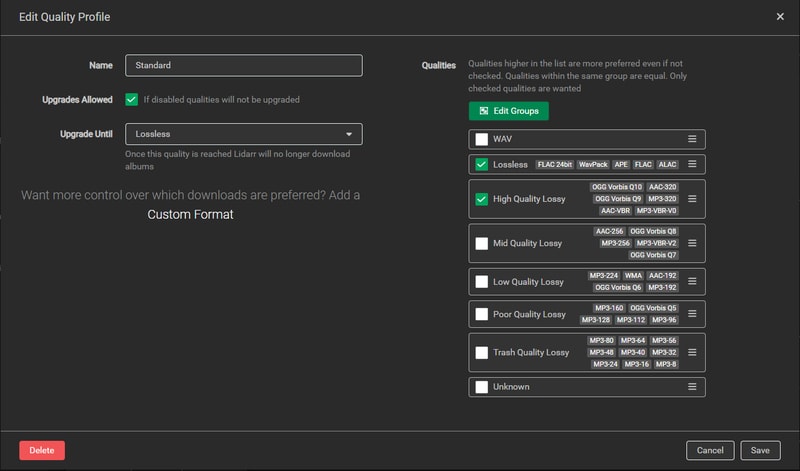
I set my Standard quality profile to Lossless and High Quality Lossy, and allowed upgrades until Lossless. This ensures I get the best available quality while still accepting high-quality MP3s when FLAC isn’t available. The upgrade setting means Lidarr will replace MP3 versions with FLAC if they become available later.
Metadata Profile
Under the Metadata Profile you can choose what types of releases are recognized and populated by Lidarr. If you ever have a strange mismatch between what Lidarr recognizes, and what is displayed on MusicBrainz, it is likely related to the Metadata Profile.
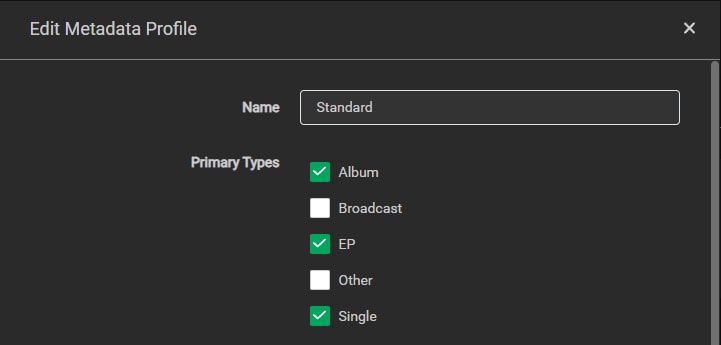
I set my Primary Types to Albums, EPs, and Singles.
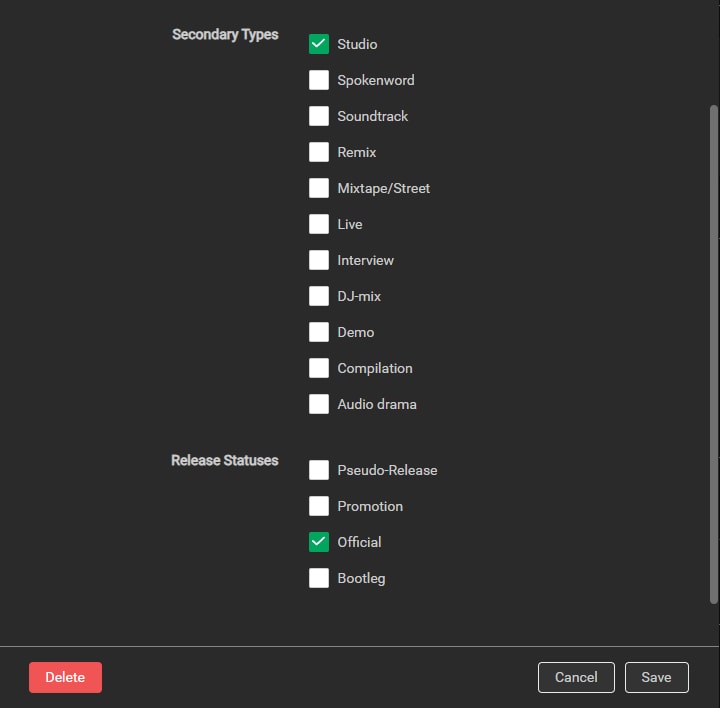
Secondary Types I limit to Studio, and Release Statuses to Official. If you start including Live and Demo releases, some artist pages will be flooded with… crap. If I ever want a specific live record, I add it manually.
Metadata
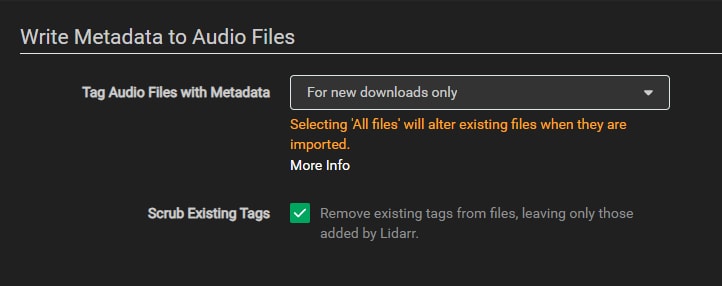
Under the metadata section we can control how Lidarr writes tags to our files. If you went to the effort to properly tag your entire library beforehand, I don’t think it is necessary to have Lidarr go back through and do the work twice. I set mine to only tag newly downloaded releases, and scrub those tags beforehand.
With these settings in place, Lidarr is configured to manage your existing library and handle new music downloads. If you choose to set up Prowlarr and a download client, Lidarr will be able to automatically grab new releases and upgrade your existing collection.
Importing Your Library
Root Folder
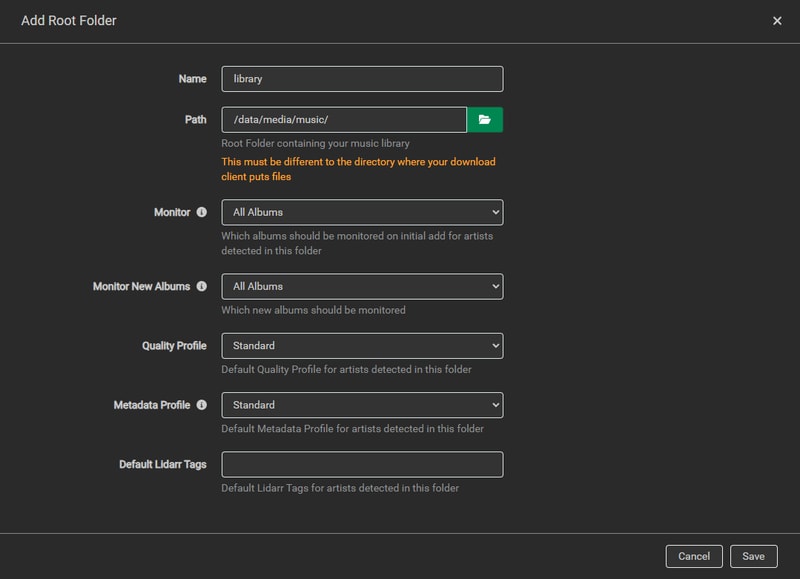
Now you are ready to import your library. Enter the path to your music library, set your Quality Profile, Metadata Profile, and click save.
This is going to take a while depending on the size of your library.
At the time I finally added my library into Lidarr, it was close to 4am and I don’t think I had blinked in 6 hours.
I went to bed to the dulcet tones of enterprise NAS drives performing their chorus.
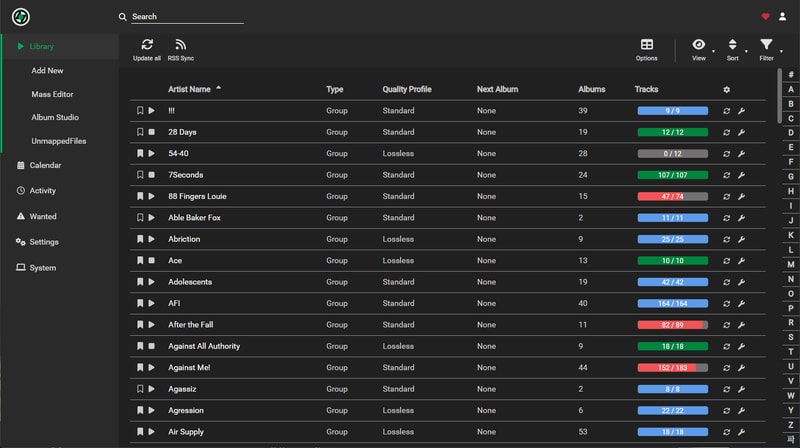
When I woke up my library had been wonderfully populated with all of these nicely colored progress bars, but the drives never stopped singing.
Unmapped Files
If you did your prep right you should hopefully have a completely empty UnmappedFiles section.
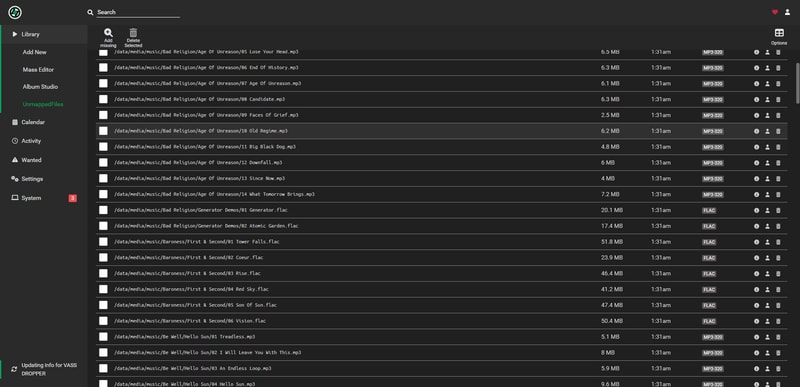
Unfortunately my prep was not perfect, and I still had a bunch of releases that needed some TLC.
Thankfully fixing these unmapped releases is a nearly identical process to when I was fixing releases back in the Tagging section. These were mostly tricky releases that slipped through the cracks.
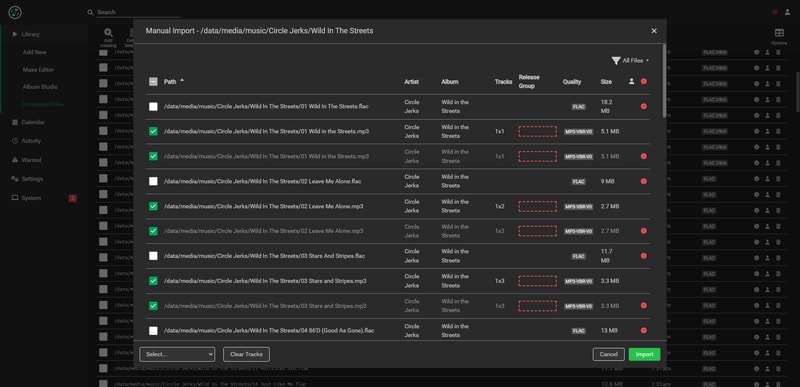
Here was an album I clearly missed
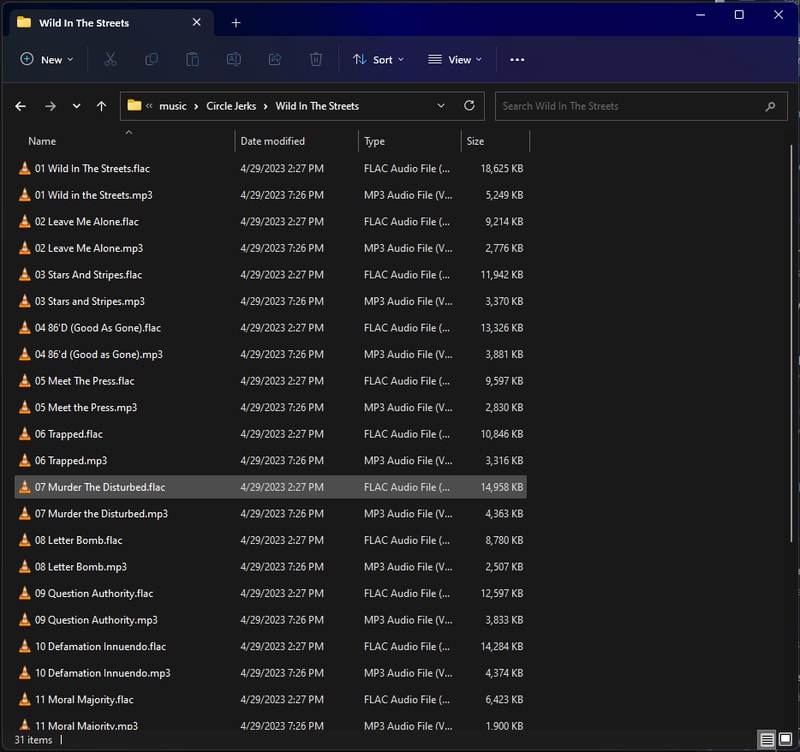
Deleting the MP3s fixed this release right up.
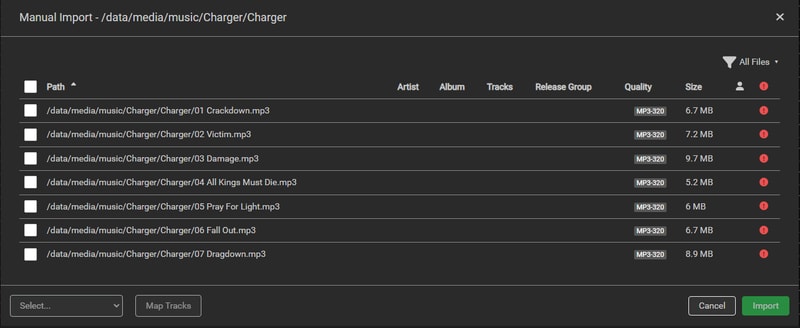
Releases that aren’t associated with an Artist or an Album, either haven’t been added to Lidarr, or more likely don’t exist on MusicBrainz. In this case Charger already existed in MusicBrainz but I needed to manually add the artist for Lidarr to find it.
Adding Artists To Lidarr
When you add a new release, or make edits to the MusicBrainz database, expect about a 45-minute delay before Lidarr can find it through their API.
I recently stumbled upon some more context and a really useful tip here:
Apparently Lidarr refreshes the MusicBrainz API 9 minutes after the hour, every hour. This is why the time you wait can feel inconsistent. On top of that, when you upload album artwork to a release on MusicBrainz, it will place the album into a 7 day long voting queue before the album is published into the API.
SO for the most efficient results, wait until after you have added your new release to Lidarr (max 1 hour), before you upload album artwork.
Even after the API has percolated your changes, you might need to give Lidarr a little push to find your release. If a standard search for the band or album doesn’t work you can manually search using an MBID (MusicBrainz ID) by prepending lidarr: to your search:
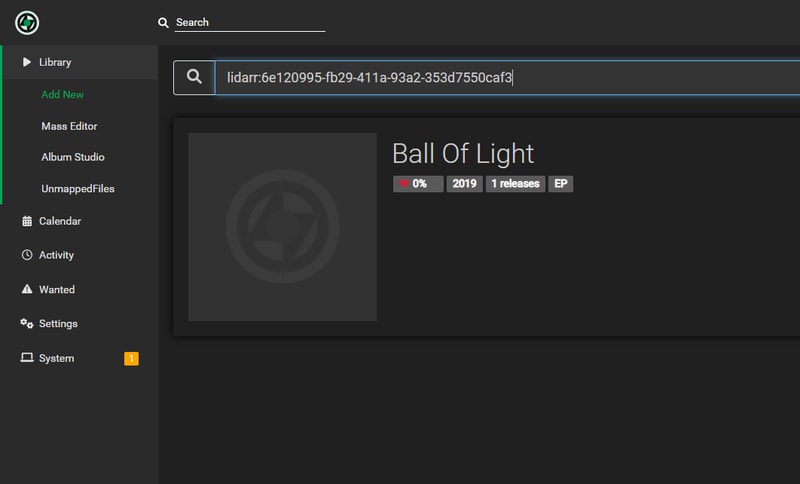
This manual search works with both Artist and Release Group MBIDs which you can find in the MusicBrainz URL:


If you need to add new releases to MusicBrainz but don’t have access to a browser with user scripts, there are some excellent alternatives:
- Harmony - works great with Bandcamp URLs
- Yambs (Yet Another MusicBrainz Seeder)
- a.tisket - handles the major streaming platforms
These tools work well enough on mobile, which can be a real life-saver.
Music-Unmapped Redux
Finally if you just can’t find a solution to getting an album imported into Lidarr (or you just don’t care anymore), make use of the music-unmapped directory we created earlier and dump things there.
My music-unmapped directory is only about 115 files large. Depending on how much effort you want to put in you might not even have to worry about it.
Lidarr really isn’t happy until you get your unmapped files close to 0, it can lead to frequent library rescanning and constant disk usage, so if you are suffering, don’t feel bad about leveraging another folder.
Usage
With your library imported and Lidarr configured, you’re ready to start managing your music collection.
I wanted to quickly document the entire flow of buying and importing a release from a new artist on Bandcamp:
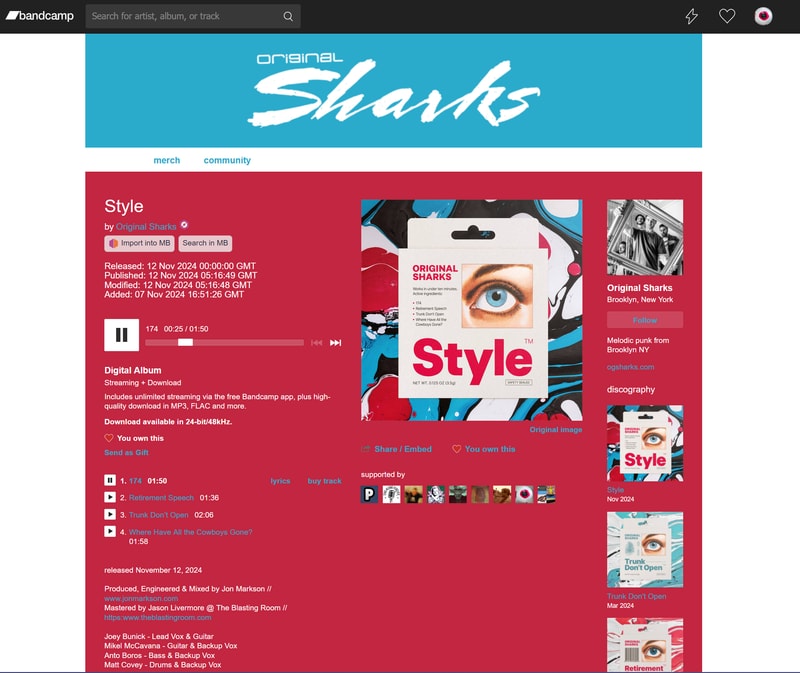
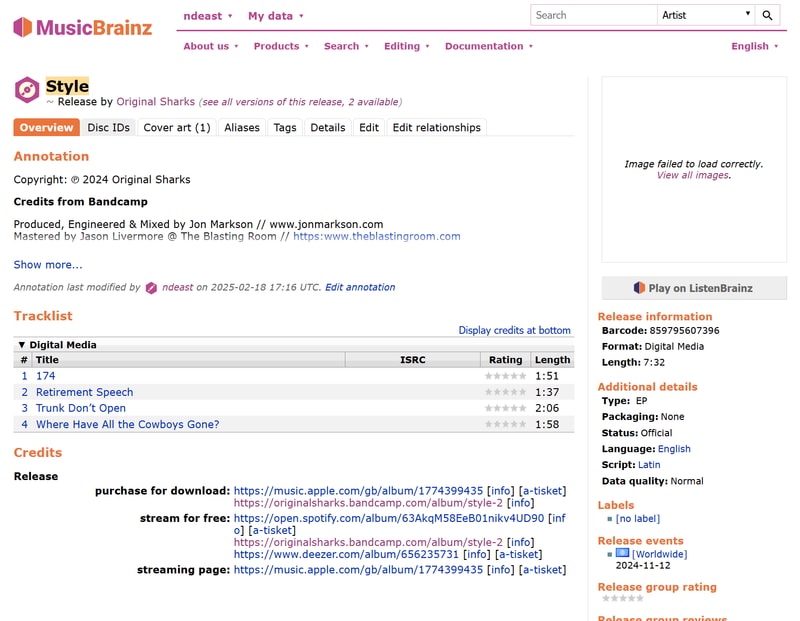
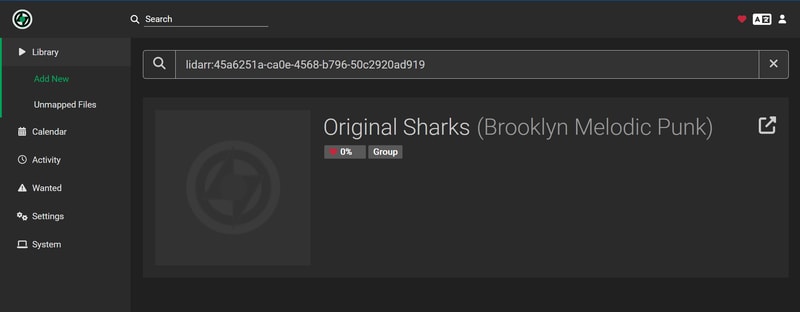
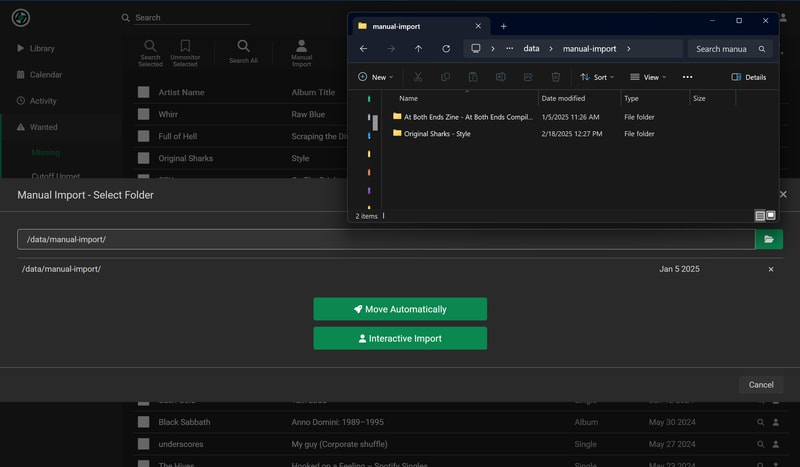
Under the Wanted > Missing tab in Lidarr there is a button at the top called Manual Import. When I want to import manually downloaded files into Lidarr, I copy them to a folder inside the data directory on my NAS called manual-import.
If the artist/album has been added to Lidarr, it will automatically identify and move the files directly into your library.
The whole process will become second nature over time, with Lidarr handling the heavy lifting of organizing and maintaining your library.
There is so much more that the software can do, that I won’t cover here, but like I said before -once you figure out the flow - Lidarr is truly magic.
If you get stuck, some very helpful resources can be found here:
Further Installations
This article has gotten quite long and I think I have covered enough of the important parts to spinning up this media server, that if you are trying to follow along, you should be able to fill in the gaps.
Container setup for Plex, Prowlarr, and your download clients will follow similar patterns to what we did with Lidarr.
Each service needs:
- A user account and config directory
- The appropriate volumes mounted in docker-compose
- Basic configuration through their respective web UIs
The excellent documentation from linuxserver.io and hotio.dev covers the specifics for each container. And Trash Guides + the Arr wiki provide most of the necessary steps for configuration.
With all the core components in place, let’s look at how this setup has performed over time.
Finished Product
I completed this home server around May of 2023, and have been both using and iterating on it ever since (coming up on 2 years now).
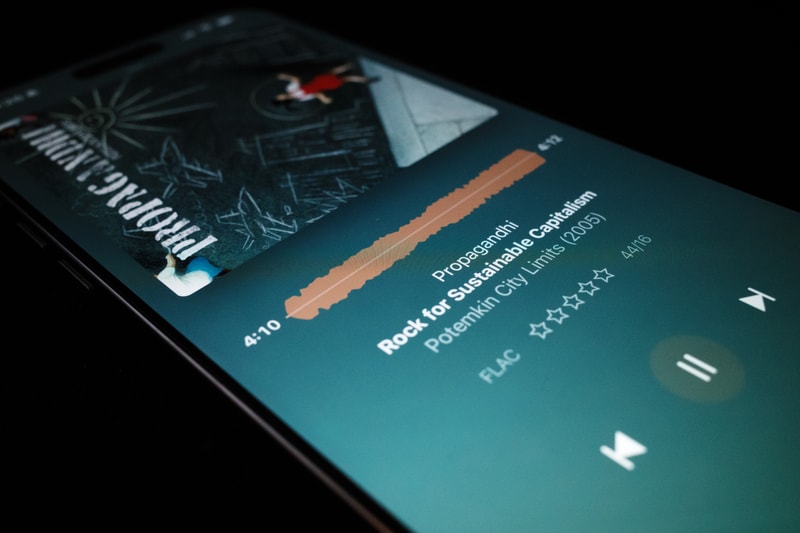
I can safely say this project has been one of the most rewarding, functional, and greatest returns on investment, I have ever taken on. Granted a lot of the value and utility comes from all of the other things you can do with your own server, outside of merely hosting your music collection - but at it’s core that has been the most rock solid function.
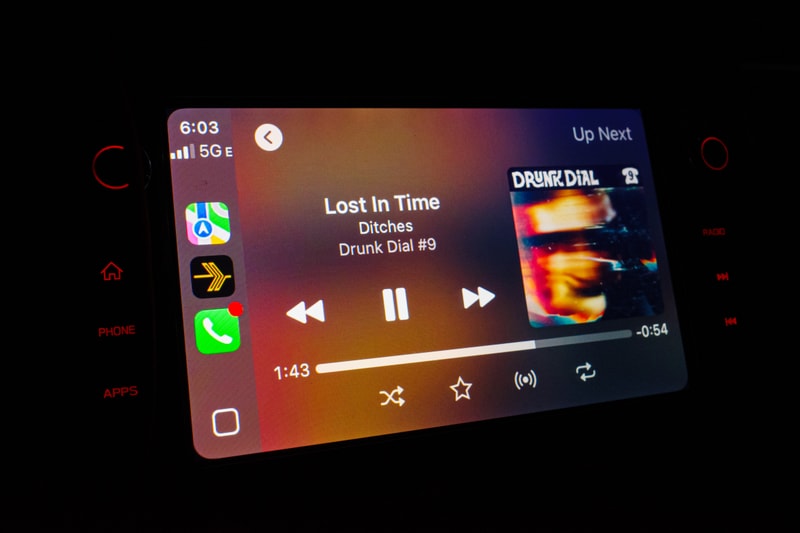
Plex/Plexamp has been fantastic. I have had a few moments where a weird update to part of my stack, or plex, required an hour or two of troubleshooting, but it’s been so infrequent and easy to recover from I am struggling to even remember the instances.
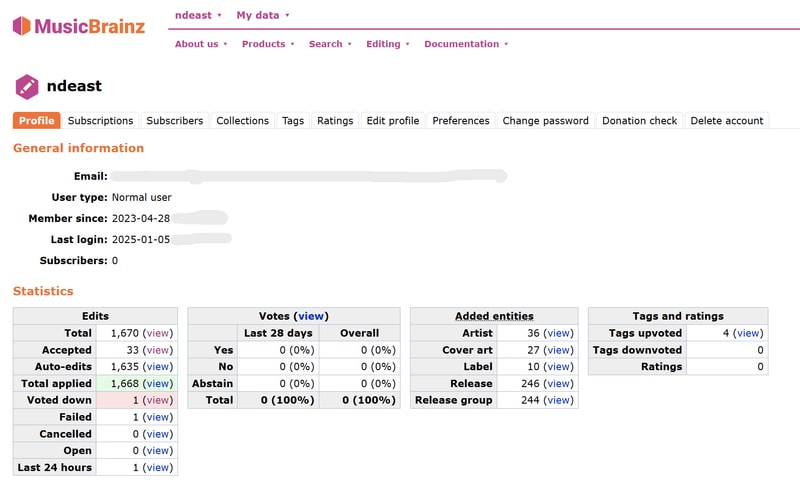
There isn’t a single moment in which I feel I am getting a lesser experience on my own than if I were to pay for a streaming service, in fact it is so good, I can’t imagine going back.
Recommendations
I don’t mean to proselytize here, but in the couple years since building this home server, I have converted 3 friends towards the path of harnessing their own media libraries. Each with different degrees of prior technical ability, they have all been incredibly happy with their results. Some going as far to buy and build a NAS, and another just simply running Plex and the Arr apps on their gaming computer. I think if the idea of this appeals to you at all, you can find a way to fit a variation of this theme into your budget, and level of technical expertise - and I highly recommend you try.
Cost Breakdown
Truth be told the majority of cost here was in time. Learning a lot of these lessons the hard way, and taking the time to research all of my possible options. I would never timebox or track my hours worked on a project I am thoroughly enjoying, I just allow myself to get into my flow, hyper-focus state and ride it out as long as it keeps me engaged.
The initial build took about 2 months from concept to completion, working primarily during evenings and weekends. This included:
- Research and planning
- Waiting on hardware deliveries
- Many iterations of trial and error
- Fully tagging my music library took an entire week on its own
With all the parts on hand and following a detailed guide, the actual setup could be completed in a long weekend. However, the learning and experimentation was in my opinion, the most valuable part of the journey.
Dollar amounts are much easier to calculate. All prices include tax and shipping:
| Part | cost |
|---|---|
| Barebones NAS PC | $100 |
| Large Dominos Cheese Pizza | $18.99 |
| Seagate Exos 7E10 8TB HDD | $114.99 |
| Seagate Exos 7E10 8TB HDD | $114.99 |
| Generic 128GB SSD | $11.99 |
| HP Prodesk 600 G4 | $84.80 |
| HP Power Adapter | $9.53 |
| Plex Lifetime License (Summer Sale) | $96.92 |
| WD Blue 500GB NVMe SSD | $51.80 |
| Corsair Vengeance DDR4 1x16GB | $34.97 |
| TOTAL | $638.98 |
On going costs should be minimal:
- Electricity for running a mini PC and my NAS 24/7
- Potential hard drive replacement or expansions
- Optional: Potential NAS cloud backup subscription (still evaluating this)
At current Spotify pricing ($11.99/mo) I suppose I would break even after 4.5 years, but I am not even going to go down that rabbit hole, as cost was never really a factor here. I get significantly more value out of running a home server and NAS beyond just music streaming.
I haven’t made the effort to plug in a Kill-o-Watt - but as it stands, the baseboard electric heating in my apartment is 20+ years old, and cold air leaks from every single door and window. I have to imagine adding my NAS and server combo costs in the ballpark of ~$100/yr to run 24/7. Buying a dedicated NAS box with a tiny power supply would probably be more efficient over the long term, but I have far bigger fish to fry when it comes to reducing my electric bill.
Long story short, I built this “on the cheap”, and I am more than happy with the investment.
Future Enhancements
While my current setup suits all of my core needs, there are a few paths to go down that I think would provide even more benefit in features, capabilities, and ease of maintenance. Some of these projects I have already tackled, and will hopefully find their way into future posts, but if you are already champing at the bit:
- Tailscale will allow you to securely and remotely tunnel into your server from outside of your network, and is one of the most incredible (currently free) software experiences I have ever used
- Caddy reverse proxy + Tailscale + Cloudflare DNS allows you to securely expose your home services under your own subdomains
- Lidarr Extended is so powerful, it turns your self-hosted streaming service up to 11
- Proxmox LXC/VM Snapshots and backups
- TrueNAS Cloud backups - Haven’t figured this one out in a non cost-prohibitive way
Looking further ahead, I’d like to explore building out the rest of my listening experience in such a way that I can effectively harness a fully open source stack. I am incredibly satisfied with Plex, and while I have seen their long trajectory in a mostly positive light, the only way to truly have ownership over the entire experience is to also control the music player. As far as options go:
- Music Assistant seems like it might have all of the casting integrations I am looking for in its audio player, and is built into Home Assistant which is another self hosted project I’d like to find a use case for
- Building a Raspberry Pi streaming audio player with something like rAudio, or running Navidrome in Jukebox mode
These enhancements represent the next steps in creating an even more robust and independent music streaming solution, while maintaining the flexibility and control that drove this project from the start.
Acknowledgements
There are definitely some environmental factors at play that likely make this more suitable for me than others, that I think are worth recognizing. For starters, I live in a big US city in which electricity is dirt cheap (compared with the rest of the world) so running multiple computers 24/7 just isn’t a consideration for me. I have access to an affordable, rock solid, gigabit (up and down) internet connection, and I have the patience to deal with the maintenance of my own machines. If any of these variables were to significantly change, it would certainly affect the viability of a self hosted service like this.
There have been quite a few elephants in my room, but the biggest that I have skirted around is one of piracy. I wanted to limit the scope of this article primarily to the core task of migrating an existing library of digital music into a self-hosted streaming platform. As should be evident, one of the primary features of Spotify is the unlimited access to NEW music and millions of artists’ discographies.
With minor changes in setup, this server project is capable of offering you just that, with the caveat of taking on the weight of some ethical considerations, and legal ramifications. Obviously this is from a US centric (legal) point of view, and while I have considerable thoughts on those moral and ethical implications, this post is nearly 15,000 words long and those topics are important enough to cover with depth. I might take the time to write about it thoughtfully in the future, but for now, if you are also trying to build a music streaming replacement, this should have carried you almost the entire way down the field.
Closing Thoughts
I didn’t expect to put 3 or 4 times the amount of effort of building the system into writing this article. I just started writing on a whim and enjoyed the process so much I just couldn’t stop. Half way through writing I switched jobs and this project got lost in the fray, but a year later I decided I really needed to complete it. I don’t particularly expect it to be read, but if you do, I hope you can glean a little bit of value from it. All that matters to me, is that it was a joy to write.